


They do their work in the background, and we don’t see them (only the results of their work). But from time to time, we also want to get some data thanks to them and be able to expand or even fill our datasets. So how to extract them and get their information directly into Power BI? That is the subject of this article.
But let’s start with a bit of the theory. It should help us get through everything.
Window full of theory
API, or Application Programming Interface, is an interface that allows you to communicate with the source system/database through defined methods. This makes it easier for us. We do not need to know exactly how the underlying systems or databases were created, their structure, or what each attribute means. In short, we call the method, which takes care of everything. Isn’t it beautiful?
Each API is unique and may have requirements for communication security, approaches, methods used, query names, type of answers, etc. Therefore, reading the API documentation we want to use is a good idea. (If it exists, of course)
As such, you can imagine the API as a waiter in a restaurant, which provides everything you need based on your request. From seating to bringing food and drinks to the final payment. You also don’t have to deal with how individual parts of the restaurant work at any given moment. The main thing is that they work.
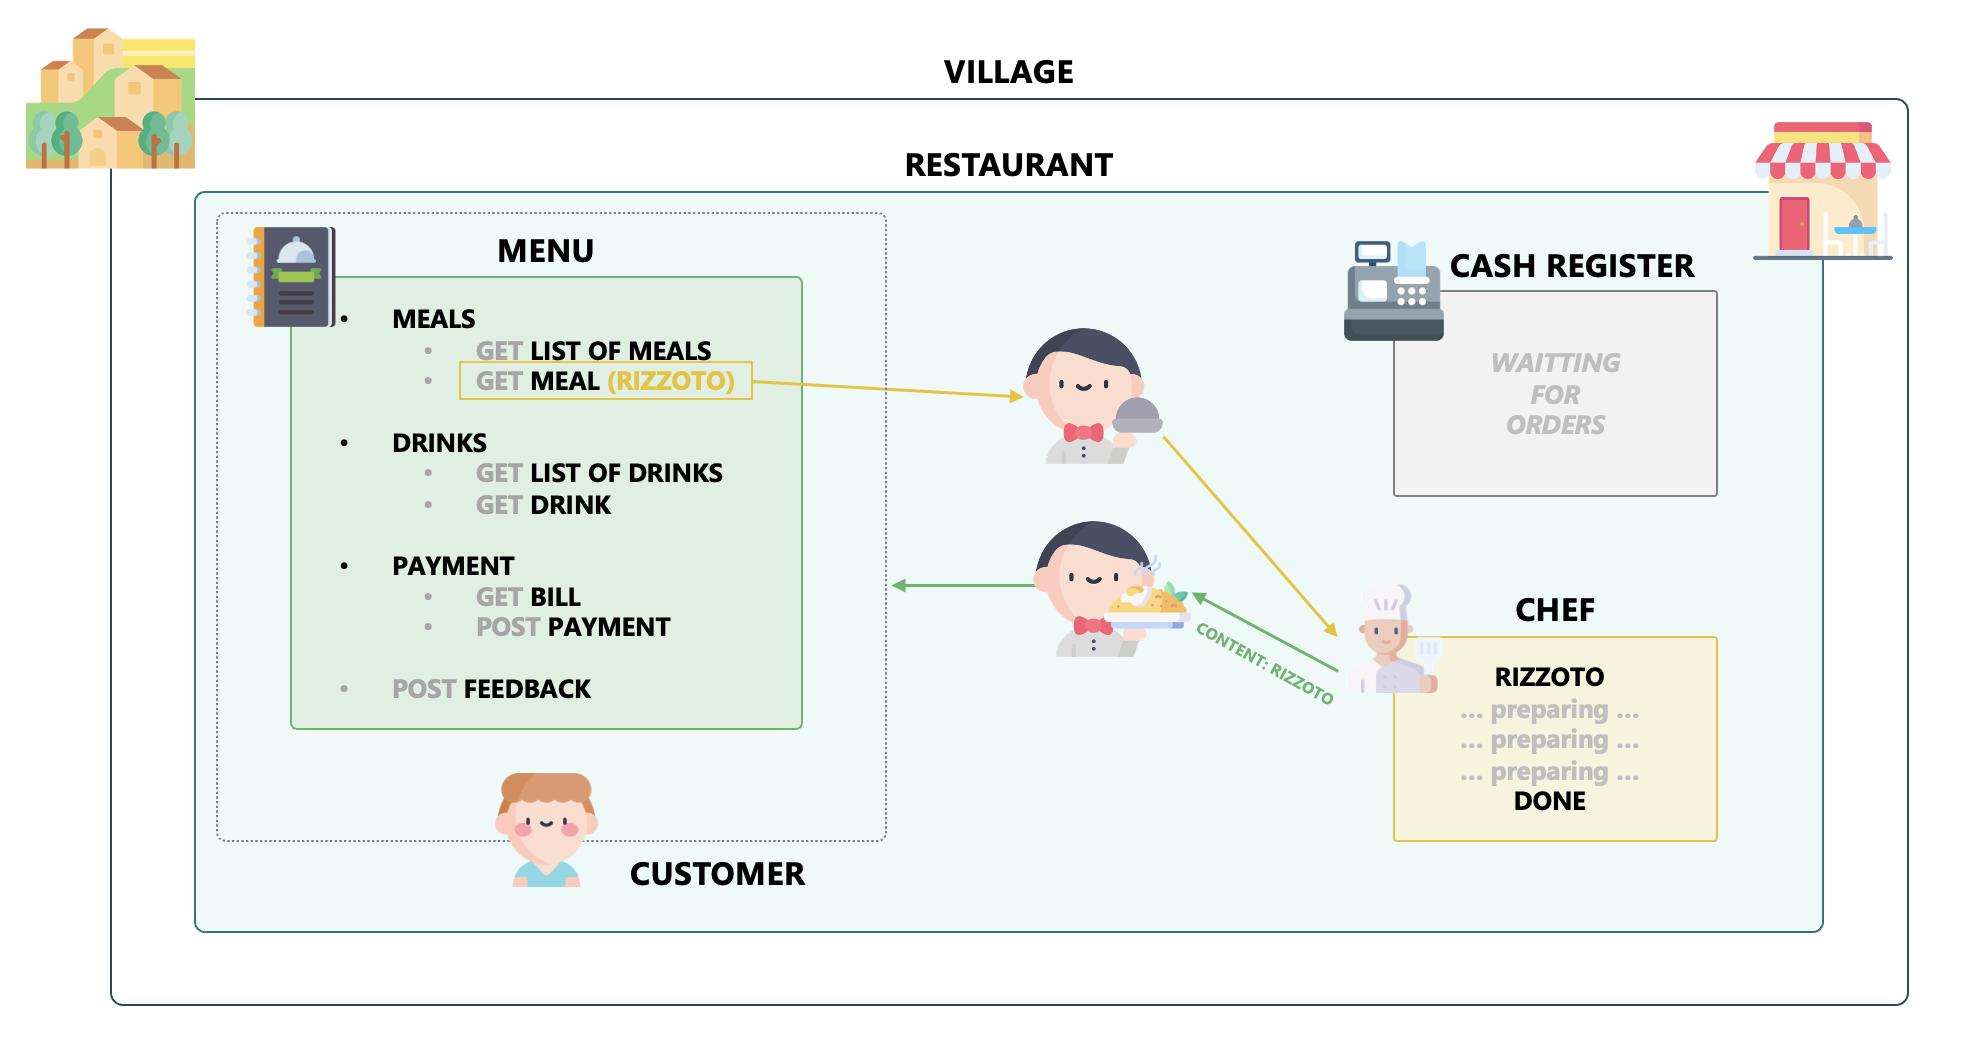 API Example with RESTaurant
You can notice the GET or POST type naming before the requests in the image. It is because these names are call types that can be used against the API. Besides these two, there are others—for example, DELETE, PUT, or PATCH. But Power Query can only work with the mentioned GET and POST.
When working with the API, we use the addresses against which the mentioned types of calls are made. At the same time, these addresses define what we are trying to do or get, as it is the form of the method to be executed. Some methods can also receive queries, with which the returned/searched Content can be modified, filtered, expanded, etc.
To understand it, it is a good idea to divide the address, URL, or IP address into a few segments to help us understand it. So let’s divide it into three parts. Let’s call the first part the Base address, the second the Relative Path, and the third the Query.
 Dividing part of URL
The Base part of the address is the part that is immutable (respectively, we will not change it in any way in the course of our inquiries), and we will set up verification against it. Power Query allows you to make this part dynamic, but please don’t do it! Why? Because then you won’t be able to update such a query in the Power BI Service because the service won’t be able to 100% verify that the validation you set for the source cannot change during runtime. So it declares that you are using a dynamic data source and will not allow refresh.
If you have any part of the address that can change or even know will change over time, put it as Relative Path. Power BI will then set validation against the original part of the address and will count on the fact that your validation will also work on these “associated” parts of the address.
The query part of the address always starts with a question mark “?”. Which attributes can be used for the Query and which operands have been implemented depends purely on the developers. You should read the mentioned documentation and experiment.
If you would like to know more details about APIs and how exacly they behave, I am recommending you to read this great article REST API explained with examples for Power BI developersfrom Mateusz Sawicki.
We are getting close to the conclusion of the introductory theory! I promise. We are left with the last two critical parts, which APIs primarily work with. I’m talking about the so-called Header of your call and the Content.
Within the Header, we define the format in which we want to return the values, any security elements, and much more. It is essential to know that we can also set them in Power Query, and it can be done very quickly.
The Content that we want to pass as part of our API query can also be defined in Power Query. The presence of Content, even empty Content, automatically turns a GET query into a POST query in Power Query. At the same time, it is necessary to know in which API format our data can be received and, therefore, to prepare and save it in binary form in advance.
What was said, but now in a shorter way:
 What Power Query can do!
Power Query vs. simple API
It will be best to show it practically. And let’s start easy. Let’s download the data from some straightforward API. It means an API that doesn’t have complex authentication and where we will get only a few or page-by-page responses (If you would like to learn more about this, here is a link to an article by Rick de Groot that explains it very well - List Generate API Calls). For demonstration purposes, I will choose one of the APIs, which is also very often recommended for some programming practice. For example, NewsAPI. This API can return news gathered from different corners of the world.
If you are a developer, you can use this API for free in the TRIAL version and try many things on it.
It only takes a little to get basic answers. Just create an account and take the generated API key in it.
 API KEY
As the documentation says, this key can be used in three ways to authenticate yourself. This is fantastic for practicing different routines:
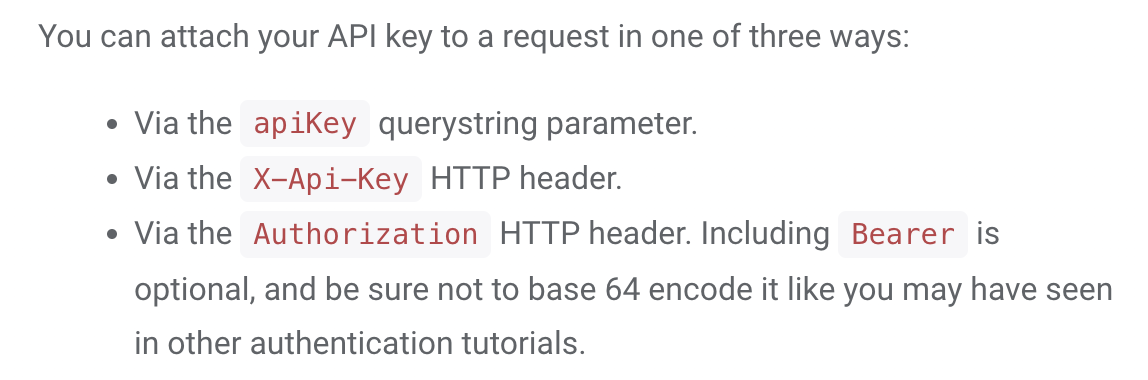 Image of official NewsAPI documentation
API Key as a Query part of the URL
All you have to do is choose one of the options and send a request for data. For example, this call:
curl --location -g --request GET 'https://newsapi.org/v2/top-headlines?country=us&apiKey={apiKey}'The attached cURL notation shows that I will use the API Key within the URL address for this attempt. Specifically within the query section. But there is another parameter, namely the “country” parameter, so we can immediately show ourselves how to create such queries!
One Power Query function will be enough for almost everything. The “almighty” Web.Contents function. Yes, a function can send a query to the site more. But this one is the best for our purposes!
Web.Contents(url as text, optional options as nullable record) as binaryI’ll stop by her again because this feature deserves it. Its first parameter is self-explanatory. It’s about “URL,” and we would probably all just come and use CTRL+C and CTRL+V to put the full address here. So please don’t do it! Do you remember what I mentioned in the previous part of the article? We can split the address into three pieces and thus make sure that if we make a function out of it, for example, it can still be updated in the Power BI Service.
- Base: https://newsapi.org/v2
- Relative Path: top-headlines
- Query: country=us&apiKey={apiKey}
When I’ve laid out this address for you like this, notice that I don’t leave any characters that serve as dividers anywhere. I removed the ”/” character between Base and Relative Path and the ”?” character between Relative Path and Query. They are not necessary. “Web.Contents” function will fill them in by themselves!
These and other parts can be inserted into the second parameter, “options.” According to the documentation, this parameter can accept many beautiful options, such as “Query, ApiKeyName, Headers, Timeout, ExcludedFromCacheKey, IsRetry, ManualStatusHandling, RelativePath, and Content.” More pieces of information are in the official documentation. Just watch out! Although within the function, it is said that this parameter accepts type Any, deeper down, it is said that it should be Type Record. Let’s assume that we will pass the function a record with the attributes whose names I listed here.
Let’s try it out:
let
    key = ""
in
    Web.Contents("https://newsapi.org/v2",
        [
            RelativePath = "top-headlines",
            Query = [
                country = "us",
                apiKey = key
            ]
        ]
    )
If you put this code into Power Query and put your key in the prepared empty string, you should see the following response:
 Response from API
This API returns its response in approximately the following form:
{
  "status": "ok",
  "totalResults": 38,
  "articles": [
    {
      "source": { "id": "", "name": "" },
      "author": "",
      "title": "",
      "description": "",
      "url": "",
      "urlToImage": "",
      "publishedAt": "",
      "content": ""
    },
    {}
  ]
}
The first thing evident from this, which was already evident a while ago in the image, is the response that came back in JSON. For its general extraction, we have the function Json.Document(). And if we wrap up the previous result, you will be assured that everything is fine!
 Positive results
API Key covered in Headers
So we can already send it within the URL as part of the Query. So let’s show how we will do o within the Header. Suppose we extend the original code in the “options” framework with Headers and define the input according to the specification in the documentation. In that case, we should reach something like this in the code:
let
    key = ""
in
    Json.Document(
        Web.Contents(
            "https://newsapi.org/v2",
            [
                RelativePath = "top-headlines",
                Headers = [
                    #"X-Api-Key" = key
                ],
                Query = [
                    country = "us"
                ]
            ]
        )
    )
You can notice in the code that I used the offered “X-Api-Key” option. Unfortunately, due to the presence of the ”-“ character, I have to wrap the entire attribute name in a fixed naming notation using #”“. However, after execution in Power Query, the result is the same and functional again!
Positive results
So we can also pass any other header components this way. So if the API will have specific requirements for header content or if we want to set it via #”Content-Type” for example, you already know exactly where!
Sending data to the API
So we have the basic parts almost all covered! We’re missing one last one! It is the passing of Content within the Content part of the call. It is the part that changes the GET method we’ve used all along to a POST method. I understand if a question mark just popped into your head! After all… Why would I want to send data away from Power Query? It is only sometimes necessary to send data directly away. Sometimes, even just API authentication processes, it is necessary to send authentication information that will return you a temporary key (token) that you can use to retrieve your data. For example, suppose you’re trying to get data from the Power BI REST API. In that case, you will have a different key than we had with the NewsAPI. Here, you must authenticate against Azure Active Directory (AAD) either as a user or as an application. AAD will return you an access key after validating basic permissions, which will have a specific lifetime (relatively short) and will need to be renewed once it expires. So in such cases, the idea is that you create the first POST request and then pass its output to the GET request. But let’s show it!
let
    output = (AzureADTenantID as text, AzureApplicationClientSecret as text, AzureApplicationClientID as text) as text =>
        let
            resource = "https://analysis.windows.net/powerbi/api",
            tokenResponse = Json.Document(
                Web.Contents(
                    "https://login.windows.net",
                    [
                        RelativePath = AzureADTenantID & "/oauth2/token",
                        Content = Text.ToBinary(
                            Uri.BuildQueryString(
                                [
                                    client_id = AzureApplicationClientID,
                                    resource = resource,
                                    grant_type = "client_credentials",
                                    client_secret = AzureApplicationClientSecret
                                ]
                            )
                        ),
                        Headers = [
                            Accept = "application/json"
                        ]
                    ]
                )
            ),
            token_output = tokenResponse[token_type] & " " & tokenResponse[access_token]
        in
            token_output
in
    output
Don’t be afraid of this code. It is pretty straightforward. I have only wrapped the whole thing in a function so that we could pass the necessary parts to this call simply and on call. Primarily, from line number 10, we added an attribute called Content. As I mentioned at the beginning, we have to give the Content in binary form. That’s the reason why the Text.ToContent() function wraps the Content. It translates the Text into binary for us. Instead of the Uri.BuildQueryString function, we could also have a direct entry of our Content, or you can define it as a JSON, which would look like this:
{
  "client_id": "",
  "resource": "",
  "grant_type": "client_credentials",
  "client_secret": ""
}
On the contrary, it would be more work because you would have to connect the parameters with the Text and remember that we also promote quotation marks directly into the Text, which would be more laborious than using the one URI function.
But let’s get back to the code as such. There is no need to know precisely what a Client’s Secret or a Resource is. But if you are interested, you can find a session where I explain it in the following link: Power Query vs Power BI REST API.
And the code itself comes from my Power BI REST API function library, which you can find on GitHub: Power BI REST API PQ
It is important to remember that even if you send an empty string within the Content, the POST method will be executed, not the GET! Please keep this in mind. It might come in handy!
This method, where you do POST once and GET a second time, has one major flaw! When you try to update something like this directly in the dataset, you can only do it in Power BI Desktop. Not in Power BI Service! Why? You can find the answer to this question in the following article by Chris Webb. It follows that where Dataset fails, Dataflow can work! The result can then also look like the following form.
 Dataflows as a solution
Or you can make a custom connector (for example, using the new SDK for Visual Studio Code), which will behave the same as the queries themselves. Still, you can use it with the Data Gateway to update the dataset directly.
Summary
But there is no complex magic for transferring data to the REST API. It’s simple. Just stick to the basic assumptions, limits, and requirements.
In any case, it is also necessary to say that: If something works, it does not mean we should always do it. Sometimes, loading the data from the API straight to Power BI is better, and in that case, approaching it incrementally and not downloading all the data every time (if possible). But on the other hand, when it comes to a larger volume of data, more frequent updates, the necessity of maintaining history, etc., then download the data in a way other than using Power Query and save it in such a way that you can then reuse it in other systems.