


Power BI provided a wide range of notification options, each with its own advantages and disadvantages, often requiring us to combine them to achieve the desired result. Historically, we primarily relied on Subscriptions, Alerts, Outages Emails, and Refresh Error Emails. Combining these options was complex and inefficient. With the introduction of the ExecuteQuery endpoint in the Power BI REST API, entirely new possibilities opened up. By sending a DAX query to a selected dataset and processing the returned data, we can create virtually any custom notification, enabling data-driven notifications. This endpoint also came with built-in support for Microsoft Power Automate and Logic Apps, significantly simplifying the process due to their native connectors to other services like Exchange, SharePoint, and Microsoft Teams (including support for Adaptive Cards).
Then came Microsoft Fabric, introducing additional capabilities across its workloads. In Real-Time Intelligence, we gained the Activator, which can trigger a notification or Power Automate flow when a milestone is reached in our data. In Data Factory, the Data Pipeline gained native integration with Office 365 Outlook and Microsoft Teams. Unfortunately, both options have limitations for more complex notifications. The Activator is restricted to specific points in time for measured milestones, while the Data Pipeline is limited to outputs of individual activities and lacks support for more advanced features like Adaptive Cards, which allow for more structured, complex, and interactive notifications.
At first glance, the most versatile option might seem to be the existing support within Power Automate and Logic Apps. However, these also have their drawbacks. For me, the most significant issues are:
- Triggering flows from Microsoft Fabric requires using an HTTP Trigger, which is not very secure and needs to be protected with an API Key. Parameters must then be passed in the HTTP Query to the flow.
- Complex input parameters, such as JSON objects, cannot be passed from Microsoft Fabric, limiting the ability to handle more intricate data structures.
- Adaptive Cards are sent via the Power Automate or Workflows Teams App. If this app is used by multiple people or flows, the notification stream can become overwhelmed, making it easy for users to overlook a specific message or card that might be critical.
Reflection on the Problem
Let’s consider a report dealing with service requests. The report presents the current state, showing the status of individual tickets—assigned, unassigned, resolved, and SLA compliance. The report is intended for a manager to monitor whether everything is running smoothly or if intervention is needed to redistribute tasks or adjust priorities. The manager, however, has other responsibilities requiring their attention. While the team generally performs well, reducing the need for frequent intervention, the manager must still check the report regularly to catch potential issues early. Over time, as problems become less frequent, the manager might check the report less often, potentially missing critical issues when they arise. A tool that can proactively address such “simple” problems and provide a sense of security without requiring the manager to leave their primary tools would be beneficial.
One option could be to create a dashboard with an alert card that triggers an activity in Power Automate, notifying the manager via a message or adaptive card in chat. Similarly, this could be achieved using a DAX query on the semantic model with a similar output. However, as mentioned earlier, users are contacted through the native Workflow app in MS Teams, where notifications from various unrelated flows can accumulate, potentially leading to important messages being overlooked. Using Outlook might be even more problematic, as critical emails can easily get lost in the flood of messages.
Another example could be a report on accounting errors within a company, where multiple accountants process incoming and outgoing transactions. Since accounting reflects the company’s financial health, everything must be accurate. However, amidst numerous transactions, errors can occur. Requiring accountants to check a report for errors after every semantic model update reduces their productivity. Instead, a card summarizing any errors (if they exist) could be sent directly to their chat, bringing the information closer to those who need it.
Microsoft Fabric is not just about reports; it’s a comprehensive data platform. What if a data load fails—not entirely, but partially (e.g., one table fails to load), or worse, a table appears to have loaded but contains outdated data? If Load_Tracking tables are implemented, such issues can be detected relatively easily. However, this information must be extracted and communicated. Power Automate (Workflow) has a connector for SQL Server, allowing it to connect to Fabric Lakehouse T-SQL Analytical Endpoint or Fabric Warehouse T-SQL Endpoint. However, processing the retrieved data within Power Automate is not its strong suit. Additionally, the flow would need to run regularly to catch such issues, requiring a mechanism to track whether the problem has already been reported.
I could add more scenarios, as this is a broader issue than it might initially seem. It’s essential to seek a generic solution that delivers relevant information in a clear format to tools that users regularly use. The information should arrive as soon as possible after an issue, error, or suspicion arises. The communication channel should be targeted to avoid mixed signals or overlooked messages due to noise.
Direction
There are undoubtedly multiple options, but I decided to explore one specific path. I knew I wanted to use Adaptive Cards in Microsoft Teams because they allow me to send structured components with icons, images, separators, and buttons for easy navigation and redirection to specific locations, such as a report for more details.
Cards can be sent to Teams channels or chats. Sending them to channels is not my goal (although it’s simpler since Webhooks can be used without additional complexity) because the issues are usually intended for specific individuals or groups. Sending messages directly to chats is a more direct option, reducing the risk of messages being ignored amidst numerous active channels awaiting acknowledgment. However, sending messages to chats requires an existing chat. For a chat to exist, there must be at least two participants (User A, User B, … User Z). The only exception is a chat with oneself, which I will ignore for now.
Another challenge is obtaining the permissions to send messages and attachments, as Adaptive Cards are technically message attachments, and Microsoft Teams handles their display. This requires specific API Permissions for such operations. Additionally, a mediator is needed to send these messages. Using a user to send the content requires access to their user token with the appropriate scope permissions. Since the goal is to create a tool that operates independently once deployed, relying on user authentication for token refreshes is not ideal. Another option is a Teams App, which requires a Service Principal and an Azure Bot (or Bot Framework).
Who or what will provide the Adaptive Cards to the bot’s identity and send them to the appropriate chat? This is where the choice becomes diverse. Options include Azure Web App, Azure Functions, etc. For this demonstration, I’ll describe the Azure Web App approach. Why? Because I spent a lot of time on it and learned a lot. Azure Functions might be simpler for this scenario (especially since they can be cost-free and operate reactively, waking up only when called after a long period of inactivity, whereas Azure Web App always has a consistent response time). However, they are not as engaging. With a Web App, you must deploy your system to handle incoming requests, route them to appropriate endpoints, and process them. This allows you to implement custom security measures, and since it’s within Azure, you can configure specific routing to prevent unauthorized access to your Web App.
Finally, a logical unit, such as a Python Notebook, is needed to execute operations like SELECT queries, DAX query execution, etc., based on strict instructions or metadata. The notebook will convert the results into an adaptive card, which it sends with the chat ID to the Web App endpoint. The Web App then forwards the content to the bot’s identity for delivery to the chat.
Simple, right? No? I didn’t think so either, but it’s doable, and once you go through it, it becomes relatively straightforward.
Here’s what’s needed:
- Azure Web App / Azure Functions / …
- Azure Bot
- Service Principal (including API Permissions)
- Microsoft Teams App
- Microsoft Teams Chat ID
- Python Notebook
Let’s start from the beginning and proceed step by step to ensure everything fits together.
Creating the Owl Bot
Why an owl? Because you hoot content at it, and it hoots it back to the user. It ignores (almost) everything else.
Creating an Azure Bot
This is the simplest part. You need to create an Azure Bot resource in Azure, which will serve as the entity for registration within the Microsoft Teams App and as the identity used by the Service Principal to send content to chats.
In the Azure Bot Service, create a Bot Service of type Azure Bot.
 Azure Bot
When creating the bot, you can choose a pricing tier. The primary difference is the guaranteed SLA for premium messages. If you don’t need this and are fine with messages being delivered as soon as the service is available, choose the Free tier.
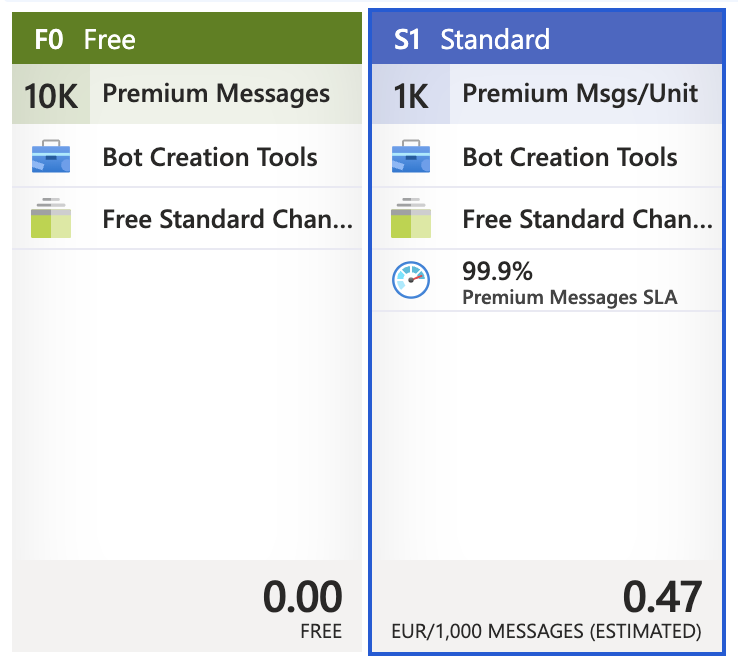 Pricing Tier
For the application type, select the one that suits your needs. For my scenario, I don’t need a Multi Tenant application; a Single Tenant application is sufficient since my bot will operate only within my tenant. If you already have an existing Service Principal you want to associate with the bot, you can do so in the final setup step on the Basics blade during creation. Alternatively, you can create a new Service Principal here.
If you chose Single Tenant, you can confirm in the Configuration tab of the created bot that the App Tenant ID matches your Tenant ID. In the Channels tab, enable Microsoft Teams channel support. After confirming the initial prompt, simply click Apply unless you want to change the bot’s support to Microsoft Teams Government.
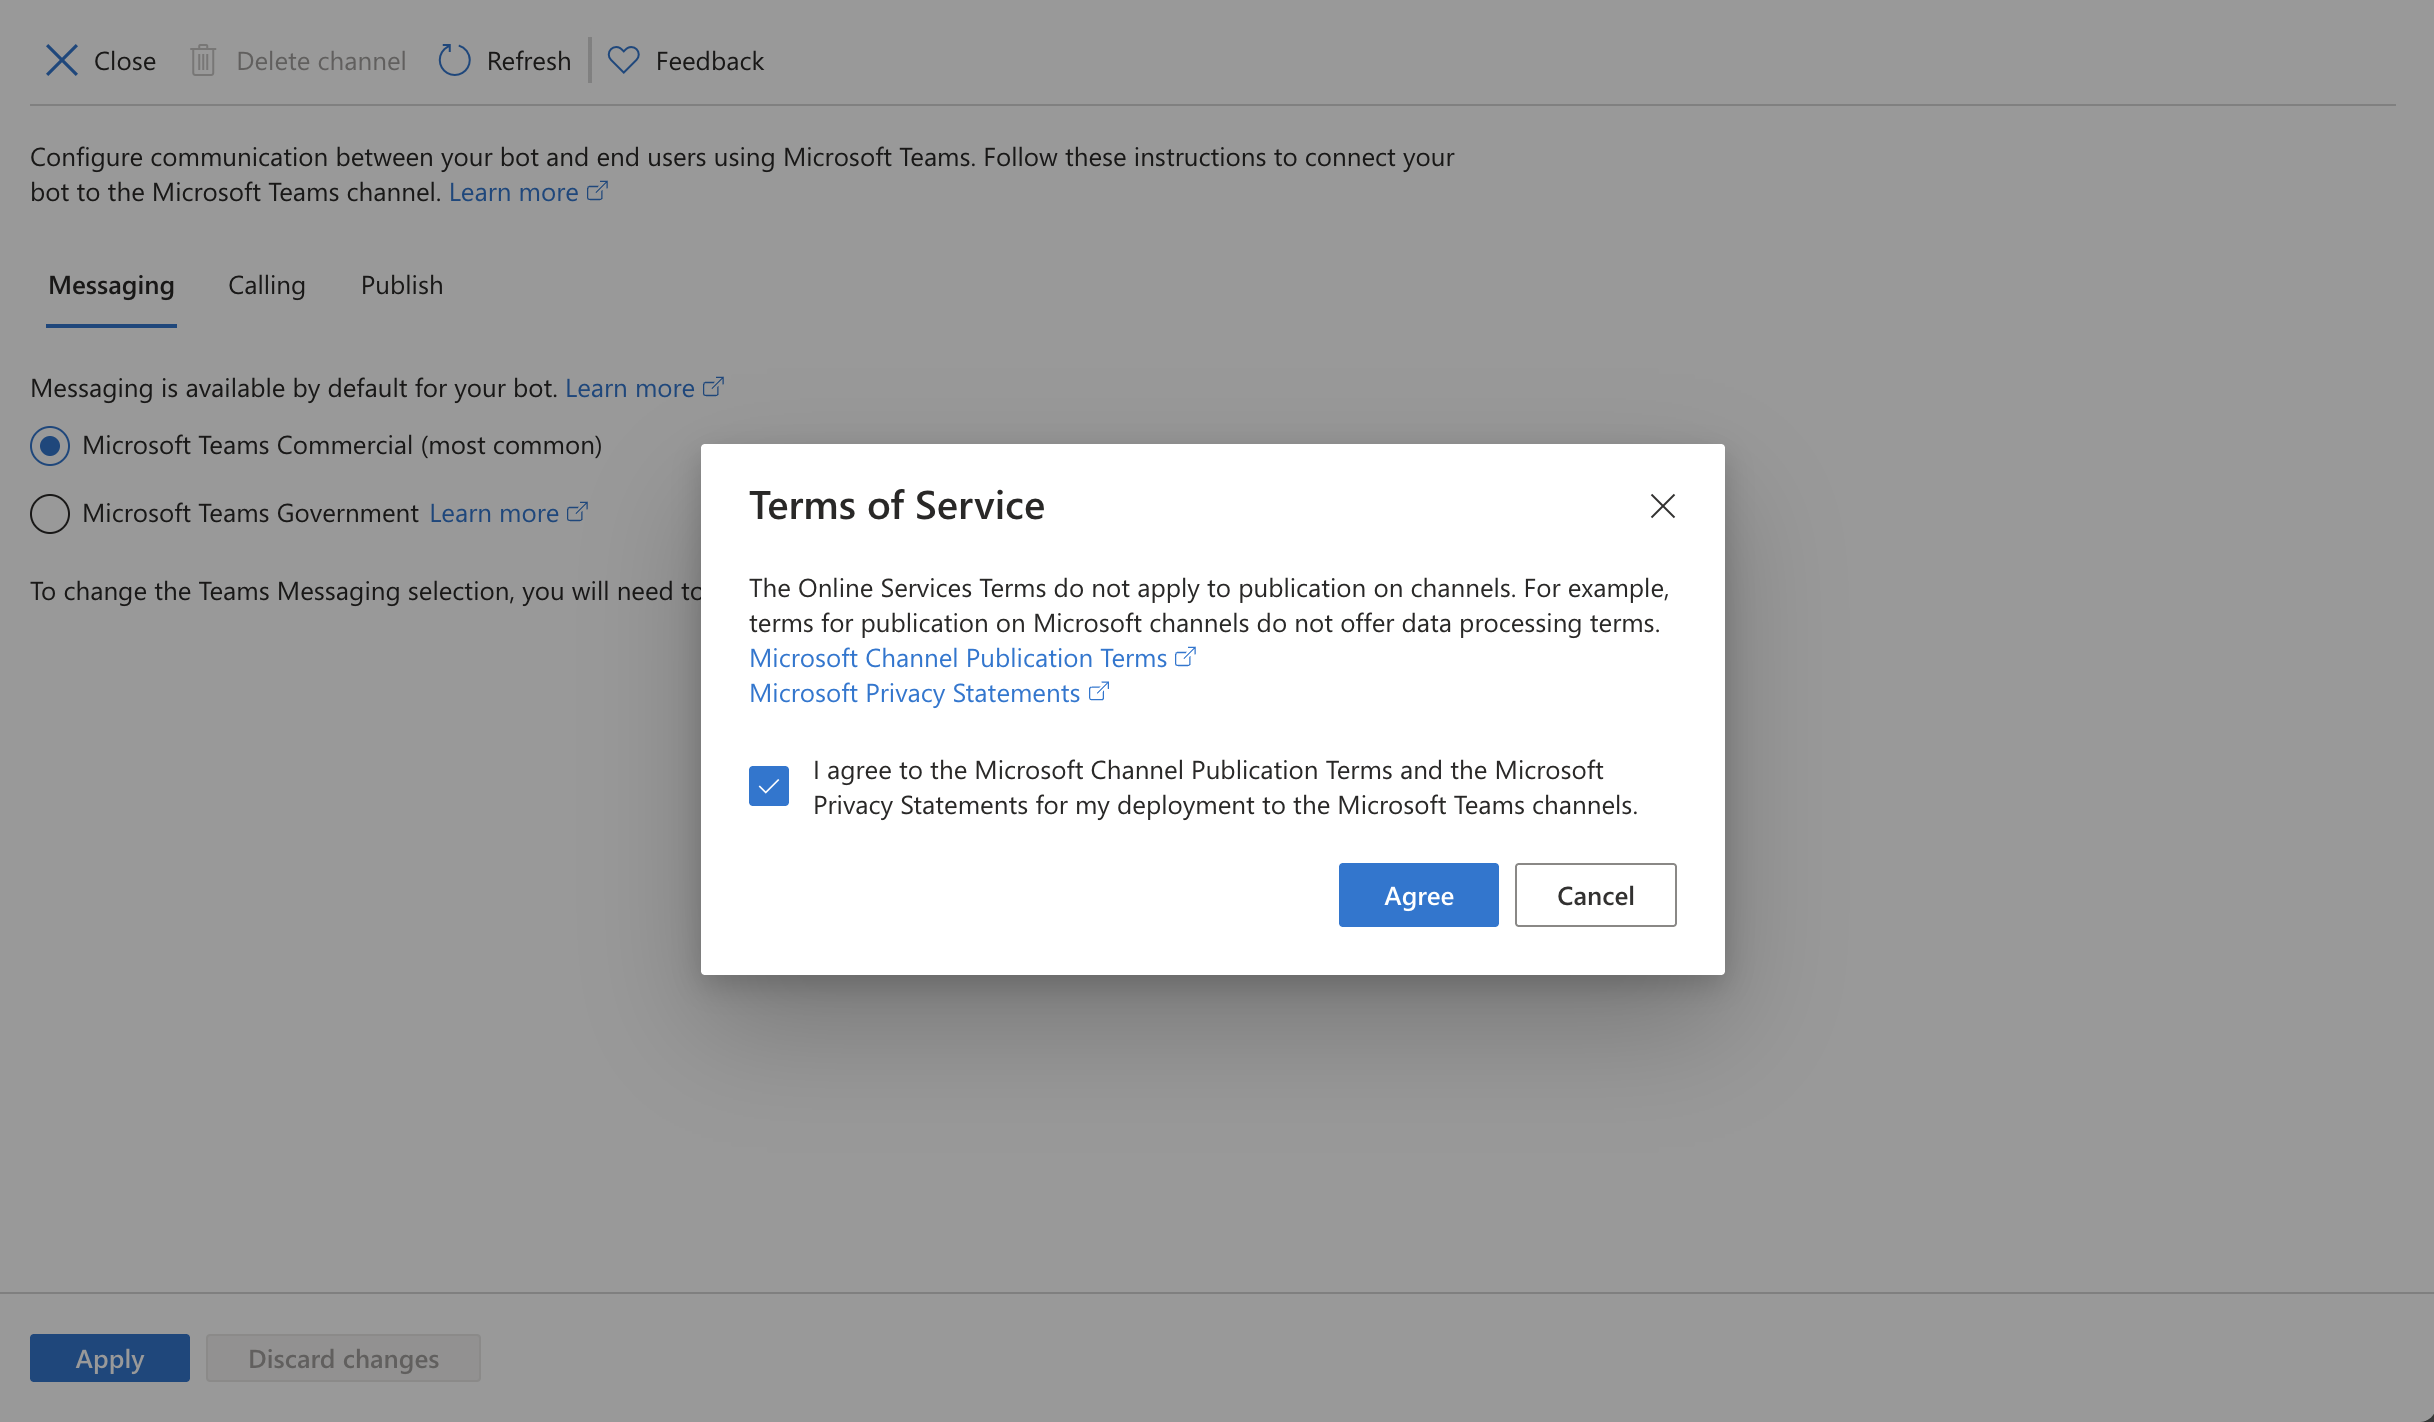 Teams Channel Support
We’ll return to this bot later, but for now, this is all we need.
Creating an Azure Web App
Within Azure App Service, you can create a Web App using the UI. Alternatively, you can use the Azure CLI, which needs to be installed first but allows for much faster and more efficient resource creation and deployment.
Here is an example template for creating an Azure Web App, including an App Service Plan:
az login

az appservice plan create --name {name-of-app-plan-service} --resource-group {resource-group-name} --sku B1 --is-linux

az webapp create --name {web-app-name} --resource-group {resource-group-name} --plan {name-of-app-plan-service} --runtime \"NODE|20-lts\"
In this template, I am creating an App Service Plan with SKU B1, which designates a Basic plan. However, for simpler purposes, you can use the lower SKU F1, which is free.
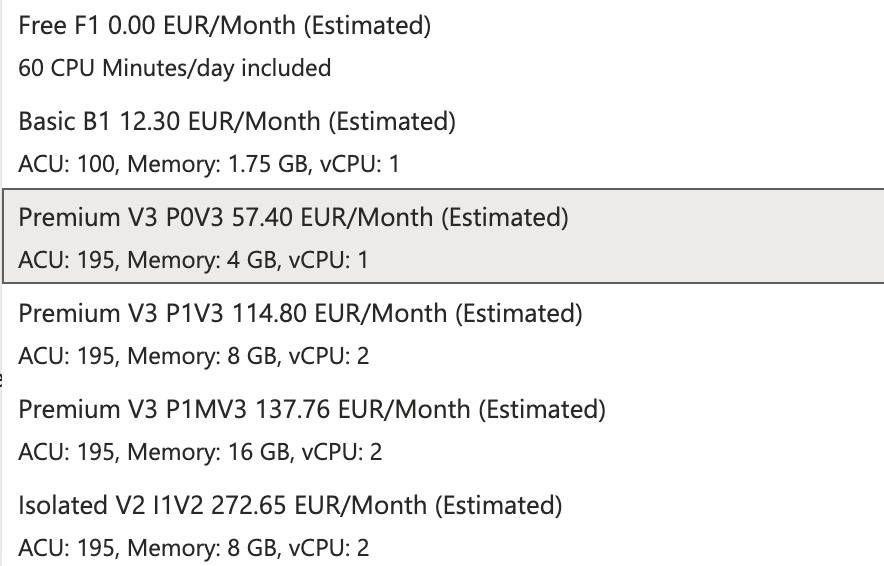 App Service Plans Options
Before we start working on the code for the Web App, it’s a good idea to set up the environment variables that the code will use. In the Settings section under Environment variables, you can either add variables one by one or use the Advanced edit option to add them all at once:
[
    {
        "name": "MICROSOFT_APP_ID",
        "value": "",
        "slotSetting": true
    },
    {
        "name": "MICROSOFT_APP_PASSWORD",
        "value": "",
        "slotSetting": true
    },
    {
        "name": "MICROSOFT_APP_TENANT_ID",
        "value": "",
        "slotSetting": true
    },
    {
        "name": "MICROSOFT_APP_TYPE",
        "value": "SingleTenant",
        "slotSetting": true
    }
]
Fill in the respective values from the Service Principal created along with the Azure Bot or the one you added to the Azure Bot instance during its creation. The Microsoft APP Password corresponds to the Service Principal Secret. Don’t forget to click Apply; otherwise, the variables won’t be saved. If you want to create a Multi Tenant bot, change the APP_TYPE accordingly.
A strong warning: If you decide to create your own bots, focus on their security—both in terms of code and configuration—to ensure they can only be used by your organization. Also, ensure that the bot only listens to commands from authorized individuals or services. In this example, I am not demonstrating security but focusing solely on deploying a simple bot to fulfill the given scenario.
The Brain of the Web App Bot
For the chatbot to perform any actions, it needs a **"brain"** to process incoming messages and execute actions. Within Azure Web App, you can use various languages and frameworks. After several attempts to solve this problem using Python, I decided to use **TypeScript** and **Node.js**. You may have noticed this choice during the Web App creation step, where I selected the runtime **NODE|20-lts**. The project structure is as follows:
.
├── src
│   ├── app.ts
│   ├── controllers
│   │   ├── adaptiveCardController.ts
│   │   └── testController.ts
│   └── routes
│       ├── adaptiveCardRoutes.ts
│       └── testRoutes.ts
├── .env
├── package-lock.json
├── package.json
└── tsconfig.json
Whole project is available here: GitHub - Azure Web App Bot Template.
The ‘src’ folder contains all the code needed to run the bot. The ‘controllers’ folder contains individual controllers that process specific endpoints. The ‘routes’ folder contains the routes that are called and passed to the appropriate controllers. The ‘app.ts’ file in the ‘src’ folder is the main file that starts the server and sets up the routes. At the same level as the ‘src’ folder, there is an ‘.env’ file containing the environment variables needed to run and test the bot locally. The ‘package.json’ and ‘package-lock.json’ files list all the required packages, and the ‘tsconfig.json’ file contains TypeScript settings.
To test if everything works, ensure you have Node.js and npm installed. Then, run the following commands in the project folder:
npm install
npm build
npm start
If everything runs correctly, you should see in the console that the server is running on port 3000. If you have Postman or another API testing tool, you can test the test endpoint:
curl -X GET http://localhost:3000/api/testThis should return a 200 OK response with the message “Work!”. This confirms that the server is running and ready to handle incoming requests. If you’ve also filled in the ‘.env’ file, the bot will attempt to connect to the Service Principal and authenticate when calling the ‘/api/adaptive-card’ endpoint. However, this endpoint requires an Adaptive Card JSON and a Chat ID. While we can already provide the first part, we don’t yet have the Chat ID because the bot hasn’t been linked to the Web App or Microsoft Teams, nor has the Service Principal been granted the necessary API permissions. So, for now, let’s ignore this endpoint and focus on deploying the code to Azure Web App.
The Visual Studio Code extension called Azure App Service can help deploy the code to Azure Web App. This extension allows you to deploy your codebase directly from the VS Code interface to Azure Web App. It’s very simple and quick. Just connect to your Azure account, select the Resource Group and Web App where you want to deploy your code, and the rest happens automatically.
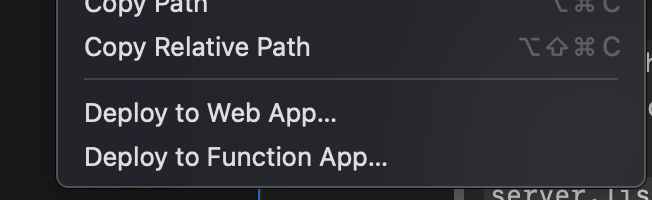 Deploy Azure Web App
Deployment to Azure Web App may take some time because your code will be passed to Oryx, which builds the environment and deploys the code. Before sending API requests to the newly deployed endpoint, check that Oryx has completed its work. You can verify this in the Azure Portal under the Deployment > Deployment Center section of your Web App, where you can view logs. If the last log entry shows “Success (Active)”, everything is ready, and you can start testing. Otherwise, wait for Oryx to finish or make the necessary adjustments based on the logs.
Now let’s link the Web App with the Bot. For this, you’ll need the Default domain of the Azure Web App, which is the URL where the Web App is deployed. You can find this in the Overview section of your Web App. It looks like this:
- https://{web-app-name}.azurewebsites.net
Enter this address into the Azure Bot’s Configuration tab in the Messaging endpoint field, appending ‘/api/messages’ to the end.
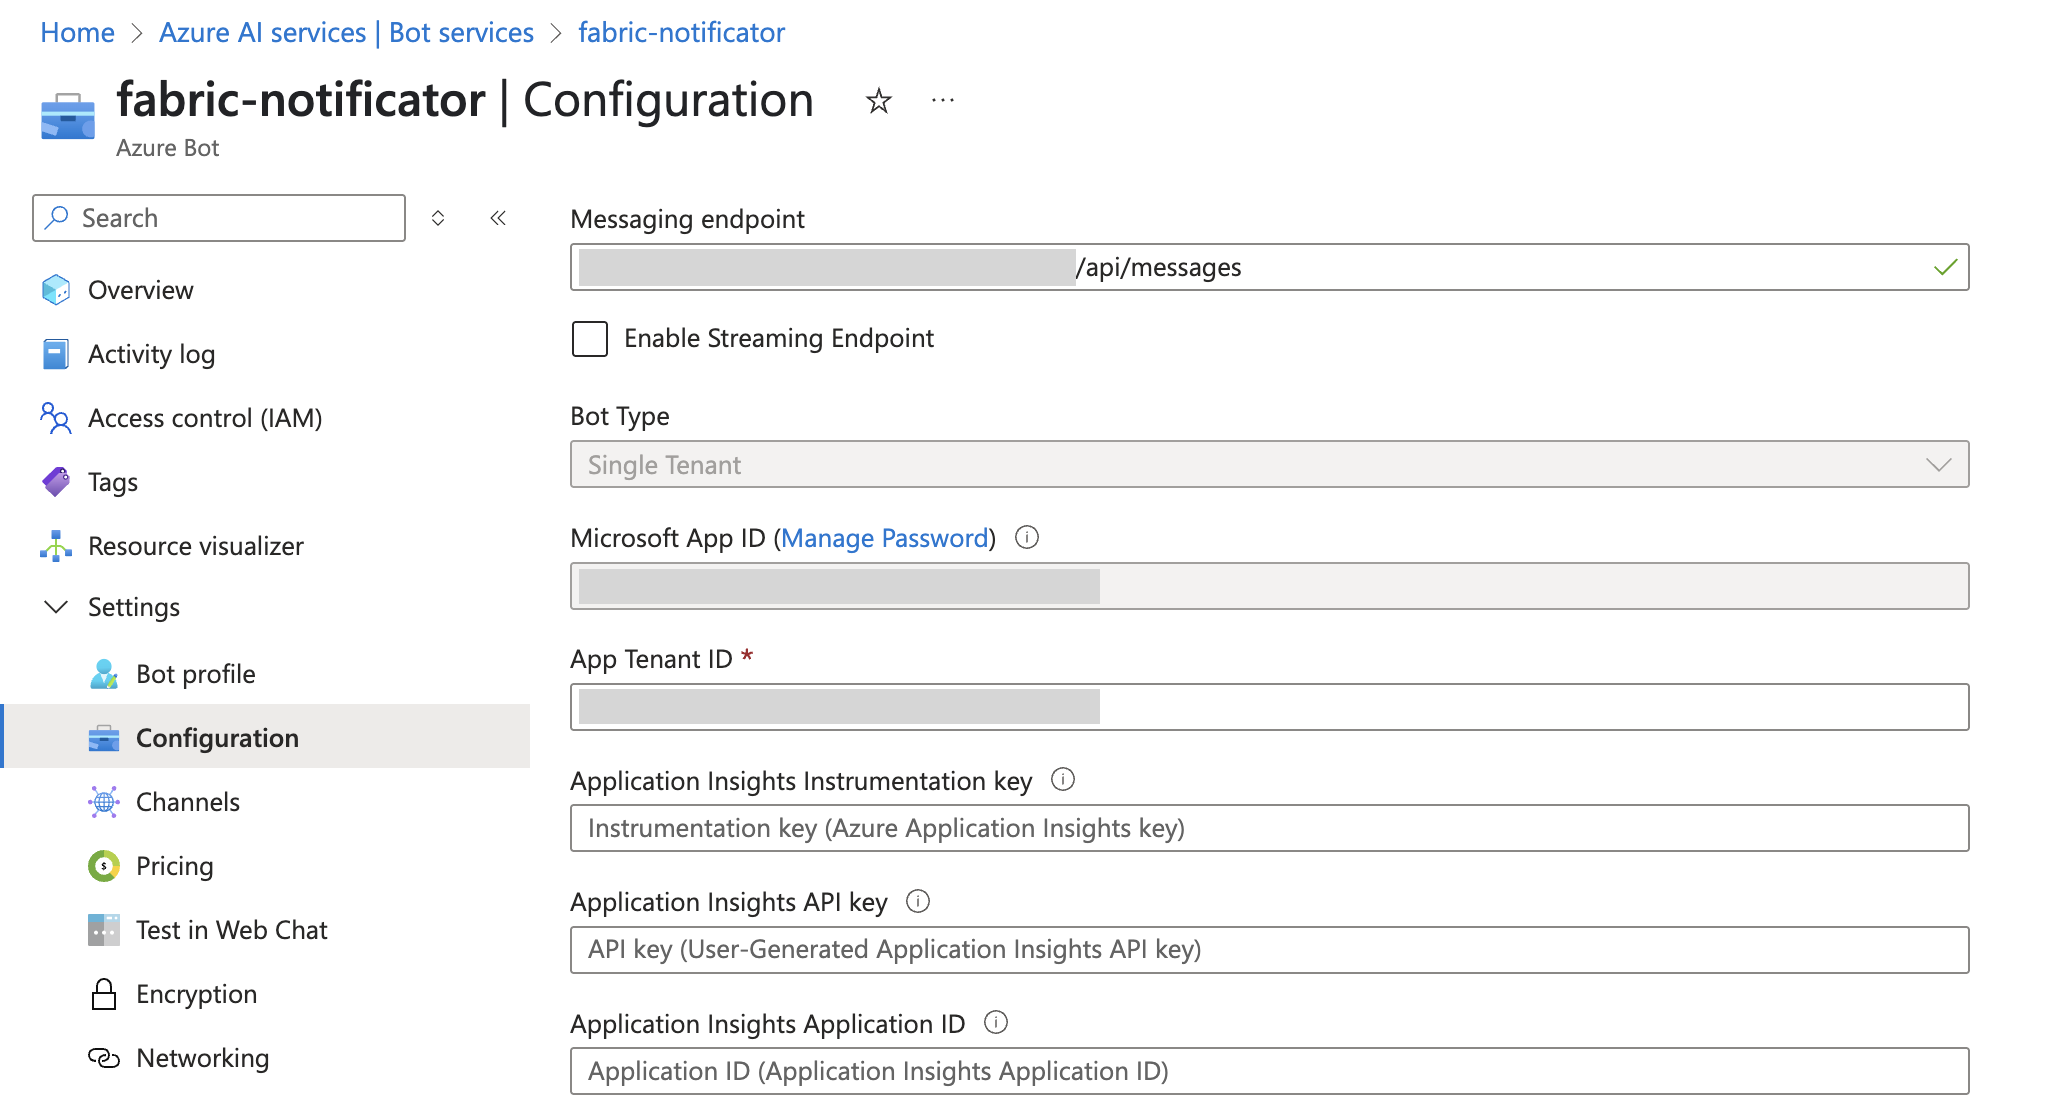 Azure Bot Messaging endpoint configuration
API Permissions for Bot Service Principal
To enable the bot to send messages to a chat, you need to configure API Permissions for the Service Principal created along with the Azure Bot. In the Azure Portal, navigate to Azure Active Directory > App registrations and locate your bot. In the API permissions tab, add the following permission:
- GraphAPI > Application Permissions > Teamwork.Migrate.All
Creating a Microsoft Teams App
With the Web App and Azure Bot ready, it’s time to create a Microsoft Teams App, which allows us to connect our bot to Microsoft Teams. The Microsoft Teams App requires a manifest file containing information about what the app does and its permissions. This manifest is then uploaded to Microsoft Teams, making the app available to users.
Here’s an example of the manifest:
{
    "$schema": "https://developer.microsoft.com/en-us/json-schemas/teams/v1.16/MicrosoftTeams.schema.json",
    "manifestVersion": "1.16",
    "version": "1.0.0",
    "id": "{app_id}",
    "packageName": "com.microsoft.teams.extension",
    "developer": {
        "name": "{developer_name}",
        "websiteUrl": "{site_url}",
        "privacyUrl": "{site_url}",
        "termsOfUseUrl": "{site_url}"
    },
    "icons": {
        "color": "{icon_192.png}",
        "outline": "{onboarding_32.png}"
    },
    "name": {
        "short": "Fabric notifications",
        "full": "Fabric notifications"
    },
    "description": {
        "short": "{short_description}",
        "full": "{full_description}"
    },
    "accentColor": "#FFFFFF",
    "bots": [
        {
            "botId": "{bot_id}",
            "scopes": [
                "personal"
            ],
            "isNotificationOnly": true
        }
    ],
    "composeExtensions": [],
    "configurableTabs": [],
    "staticTabs": [],
    "permissions": [
        "identity",
        "messageTeamMembers"
    ],
    "validDomains": [
        "*.powerapps.com"
    ]
}
The manifest contains details about the app, such as its name, description, icons, and permissions. If the app is intended solely as a notifier (as in this case), set ‘isNotificationOnly’ to ‘true’. Replace all placeholder values in ‘{}’ with actual values. Note that the ‘id’ is not the Azure Bot or Service Principal ID but the Microsoft Teams App ID, which is generated when creating the app. If deploying via the manifest, you’ll need to generate the Teams App ID, which can be done using tools like the Visual Studio Code extension TMDL UUID Generator. The ‘bot_id’ should be the Service Principal ID associated with the Azure Bot, the same one used in the Web App. Include 192x192 and 32x32 images alongside the manifest in a ZIP file.
Upload the ZIP file via the Admin - Microsoft Teams - Manage Apps page using Actions (top-right corner) > Upload new App. If successful, you’ll see a confirmation message:
 Uploaded new App
The app will then be registered in the internal Teams Apps Store and should appear in Microsoft Teams for users to install after some time. If it doesn’t, check permissions and ensure the app is allowed for the tenant. If you don’t want to wait for the app to propagate to the Teams Store, you can install it for a user using the REST API:
curl --location 'https://graph.microsoft.com/v1.0/users/{user-id | user-principal-name}/teamwork/installedApps' \\
--header 'Content-Type: application/json' \\
--header 'Authorization: Bearer xxxx' \\
--data-raw '{
   "teamsApp@odata.bind" : "https://graph.microsoft.com/v1.0/appCatalogs/teamsApps/{teams-app-id}"
}'
The Bearer token can be obtained using a Service Principal with permissions for the Teams App Catalog. Ensure the following Microsoft Graph API permissions are configured:
- Delegated: TeamsAppInstallation.ReadWriteSelfForUser, TeamsAppInstallation.ReadForUser
- Application: TeamsAppInstallation.ReadWriteSelfForUser.All, TeamsAppInstallation.ReadForUser.All
If successful, you’ll receive a ‘201 Created’ response, and the app should appear in Microsoft Teams for the specified user after clearing the cache. However, this doesn’t complete the process, as you’ll also need the Chat ID to send messages.
Obtaining the Chat ID
The Chat ID is not straightforward to retrieve. While you have the Teams App ID, it’s not directly tied to the user. Once you have the user’s app installation ID, you can retrieve the Chat ID using the following query (note that it may take a few minutes for the installation to propagate):
curl --location 'https://graph.microsoft.com/v1.0/users/{user-id | user-principal-name}/teamwork/installedApps?\$expand=teamsApp\(\$select=id)&\$filter=contains\(teamsApp/id,'{teams-app-id}')' \
--header 'Content-Type: application/json' \
--header 'Authorization: Bearer XXXX'
Example response:
{
    "@odata.context": "https://graph.microsoft.com/v1.0/$metadata#users('xxxx.xxxx@company.com')/teamwork/installedApps(teamsApp(id))",
    "@odata.count": 1,
    "value": [
        {
            "id": "{teams-app-installation-id}",
            "consentedPermissionSet": null,
            "teamsApp": {
                "id": "{teams-app-id}",
            }
        }
    ]
}
The ‘teams-app-installation-id’ is needed to retrieve the Chat ID:
curl --location 'https://graph.microsoft.com/v1.0/users/{user-id | user-principal-name}/teamwork/installedApps/{teams-app-installation-id}/chat' \
--header 'Content-Type: application/json' \
--header 'Authorization: Bearer XXXX'
If the first call indicates no instance exists, wait a moment and try again. Once successful, you’ll receive a JSON response containing the ‘id’ attribute, which is the Chat ID. Note that if the app is uninstalled and reinstalled, the Chat ID will change, so it’s good to automate this process.
Testing the Bot
To test, send a request to the /api/adaptive-card endpoint, which should return an Adaptive Card JSON. You can then send it to the chat using the following query:
curl --location 'https://{web-app-name}.azurewebsites.net/api/adaptive-card' \
--header 'Content-Type: application/json' \
--data-raw '{
  "chatId": "{chat-id}",
  "serviceUrl": "https://smba.trafficmanager.net/teams/",
  "adaptiveCardDefinition": {
      "type": "AdaptiveCard",
      "version": "1.2",
      "body": [
        {
          "type": "TextBlock",
          "text": "Hello, I am working!",
          "weight": "Bolder",
          "size": "Medium"
        }
      ]
    }
}'
If successful, you’ll receive a ‘200 OK’ response and the Adaptive Card JSON.
 First successfully send adaptive card
If it’s the first user or dependencies haven’t fully propagated, you might see the following error:
{
    "error": "Failed to send adaptive card.",
    "details": "The bot is not installed in the chat."
}
In such cases, wait for propagation and try again. Sometimes, this process can take a while (even up to a day), but once everything is set up, the bot should work without issues.
If you’ve reached this point, you’ve almost completed the setup. You now have a bot capable of sending messages to Microsoft Teams. The final step is to create a test Fabric Notebook that generates Adaptive Card JSON and sends it to the Web App, which then delivers the card to the chat via the bot.
Fabric Notebook
Let’s add another scenario that is very user-friendly thanks to the cards. In this case, the user could be a transformation flow administrator. If we only wanted to send a notification that the orchestration of transformations has completed, a Python Notebook with code like this would suffice:
import requests
import json
import datetime

# This can be a cell with parameters
chat_id = {chat-id}
web_app_name = {web-app-name}

endpoint_uri = f"https://{web-app-name}.azurewebsites.net/api/adaptive-card"

def send_api_request(method, url, headers, data=None, response=True):
    call = requests.request(method, url=url,headers=headers,json=data)
    if response:
        return call.json()
    else:
        return call

def generate_adaptive_card(current_time) -> dict:
    formatted_time = current_time.strftime("%A, %d %B %Y at %H:%M:%S")

    card = {
        "type": "AdaptiveCard",
        "body": [
            {
                "type": "TextBlock",
                "text": "📅 Your pipeline has been refreshed",
                "weight": "Bolder",
                "size": "Large",
                "wrap": True,
                "color": "Accent"
            },
            {
                "type": "TextBlock",
                "text": f"Load ended at: **{formatted_time}**",
                "wrap": True,
                "spacing": "Small",
                "fontType": "Default"
            }
        ],
        "actions": [
            {
                "type": "Action.OpenUrl",
                "title": "Check your fresh data",
                "url": "https://adaptivecards.io"
            }
        ],
        "version": "1.4"
    }

    return card

datetime_now = datetime.datetime.now()

headers = {
    'Content-Type': 'application/json',
    'Accept': 'application/json'
}
payload = {
    "chatId": chat_id,
    "serviceUrl": "https://smba.trafficmanager.net/teams/",
    "adaptiveCardDefinition": generate_adaptive_card(datetime_now)
}
send_api_request("POST",endpoint_uri,headers,payload,False)
Here’s what the result of such a Python notebook would look like:
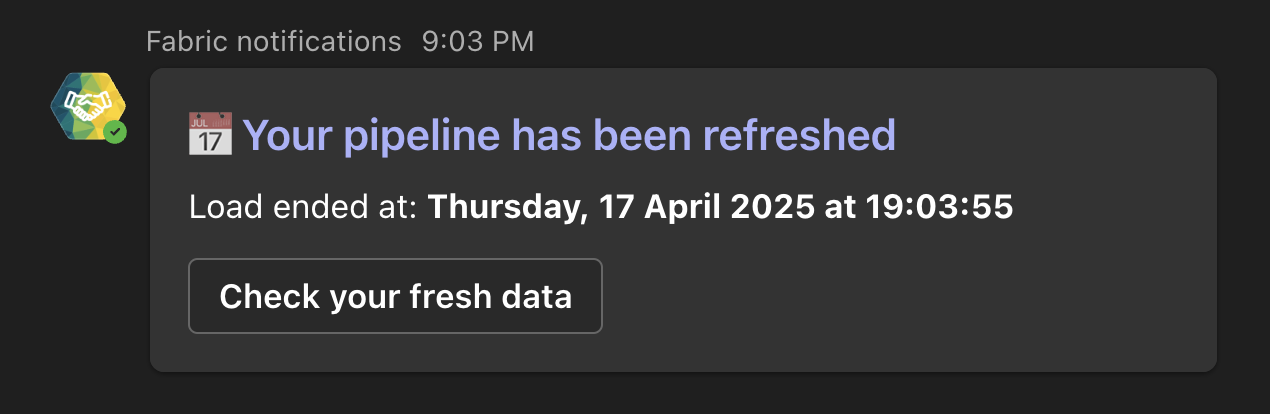 Result of Orchestration pipeline
Here’s a slightly more complex version that considers identified errors during the transformation flow and sends them directly to the administrator so they know what to expect. The button also adapts, either redirecting the user to the Microsoft Fabric Monitor or to a specified URL, which can also be a parameter.
import requests
import json
import datetime

# This can be a cell with parameters from Data Pipeline (for example)
chat_id = ""
web_app_name = ""
error_messages = []

endpoint_uri = f"https://{web-app-name}.azurewebsites.net/api/adaptive-card"

def send_api_request(method, url, headers, data=None, response=True):
    call = requests.request(method, url=url, headers=headers, json=data)
    if response:
        return call.json()
    else:
        return call

def generate_adaptive_card(current_time, error_list=None) -> dict:
    formatted_time = current_time.strftime("%A, %d %B %Y at %H:%M:%S")
    error_count = len(error_list)
    has_errors = error_list and error_count > 0

    card_body = [
        {
            "type": "TextBlock",
            "text": ("⚠️ " if has_errors else "📅 ") + "Your pipeline has been refreshed" + (f" with {error_count} issues" if has_errors else "✅"),
            "weight": "Bolder",
            "size": "Large",
            "wrap": True,
            "color": "Attention" if has_errors else "Accent"
        },
        {
            "type": "TextBlock",
            "text": f"Load ended at: **{formatted_time}**",
            "wrap": True,
            "spacing": "Small"
        }
    ]

    if has_errors:
        card_body.append({
            "type": "TextBlock",
            "text": "Following errors occurred during execution:",
            "weight": "Bolder",
            "color": "Warning",
            "wrap": True,
            "spacing": "Medium"
        })

        card_body.append({
            "type": "Container",
            "items": [
                {
                    "type": "TextBlock",
                    "text": f"• {error}",
                    "wrap": True,
                    "spacing": "None"
                } for error in error_list
            ]
        })

    card = {
        "type": "AdaptiveCard",
        "body": card_body,
        "actions": [
            {
                "type": "Action.OpenUrl",
                "title": "Check details" if has_errors else "Check your fresh data",
                "url": "https://app.powerbi.com/monitoringhub?language=en-US&experience=fabric-developer" if has_errors else "{YOUR-URI}"
            }
        ],
        "version": "1.4"
    }

    return card

datetime_now = datetime.datetime.now()

headers = {
    'Content-Type': 'application/json',
    'Accept': 'application/json'
}

payload = {
    "chatId": chat_id,
    "serviceUrl": "https://smba.trafficmanager.net/teams/",
    "adaptiveCardDefinition": generate_adaptive_card(datetime_now, error_messages)
}

send_api_request("POST", endpoint_uri, headers, payload, False)
If any errors occur, the administrator will receive a chat message like this:
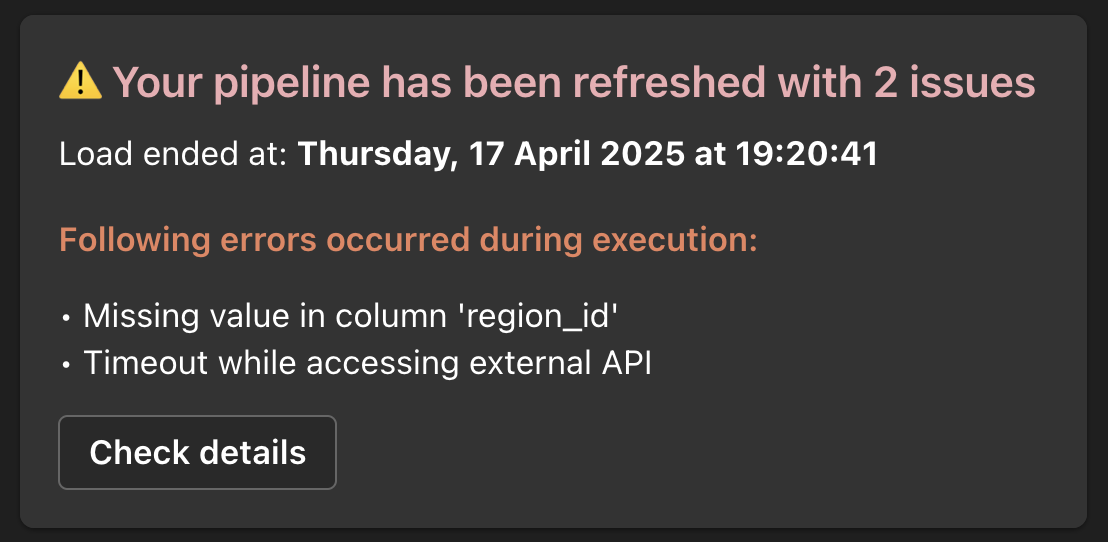 Errors in Orchestration pipeline
Adaptive Cards allow you to display all kinds of information and actions, making them extremely versatile and adaptable to your needs. They can include images like PNG, JPG, GIF, or even SVG, either hosted externally or embedded directly in the card declaration as base64 or utf-8, for example:
{
    "type": "Image",
    "url": "data:image/png;base64,{base64-encoded-image}"
}
I mention this because it allows you to embed charts and visualizations into the card. HOWEVER, keep in mind that there is a size limit for cards, which is 25KB. If you have large images, it’s better to host them externally and include them in the card as a URL. Adaptive Cards also support Rich Text, so you can include HTML tags and text formatting in the card. However, be cautious, as Adaptive Cards are not full-fledged HTML and CSS, so some tags may not work or will be ignored.
Additionally, if you decide to use SVG in an Adaptive Card and create them inefficiently, such as by converting from a Plotly chart, you will almost certainly exceed the capacity limit. If you build the SVG yourself, you can render even very complex charts and visualizations by using efficient and simpler code. A second warning regarding SVG is that they WILL NOT RENDER on mobile in Adaptive Cards! Therefore, you need to convert them to PNG, which will impact any dynamic elements you might have in SVG (animations, etc.). For example, using the Python library cairosvg, which is not natively part of Microsoft Fabric Runtimes but can be installed. Here’s a small example of converting SVG to PNG:
%pip install cairosvg
import cairosvg
import base64

# Create an SVG string
svg_initial = "<svg xmlns='http://www.w3.org/2000/svg' width='100' height='100'>"
svg_circle = "<circle cx='50' cy='50' r='40' stroke='black' stroke-width='3' fill='red'/>"
svg_end = "</svg>"
svg_content = svg_initial + svg_circle + svg_end

# Encode SVG code to base64
png_bytes = cairosvg.svg2png(bytestring=svg_content.encode('utf-8'))
encoded_png = base64.b64encode(png_bytes).decode('utf-8')

# Create a data URL for the PNG image
png_data_url = f"data:image/png;base64,{encoded_png}"
Using the same approach, I prepared an Adaptive Card that helps monitor and track when data loading from a source fails. What was the source? A Lakehouse, where I queried a view with refresh data filtered for the last 30 days. I created an SVG chart, converted it to PNG, and embedded it into the Adaptive Card. The result looks like this:
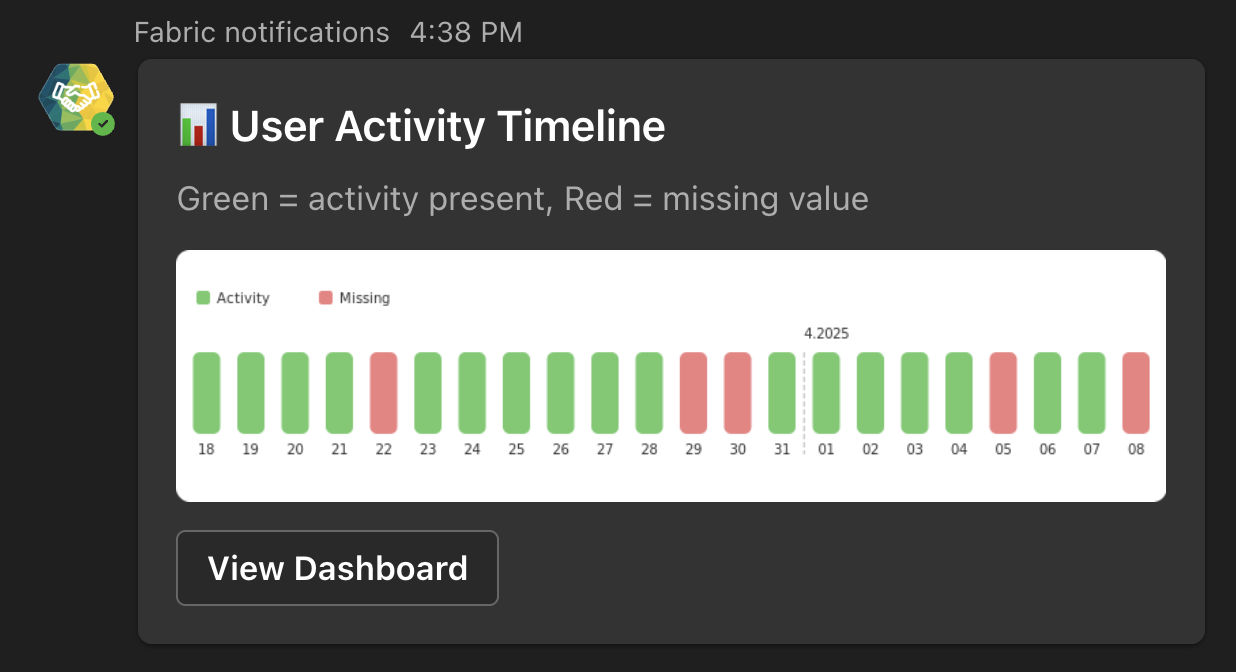 Adaptive Card with PNG/SVG Timeline
Of course, the data can come from anywhere:
- Data Pipeline (as a parameter)
- Lakehouse (T-SQL Endpoint or directly from files)
- Warehouse (SQL Endpoint or directly from files)
- Notebook (as a parameter)
- Semantic Model (DAX Endpoint, XMLA Endpoint)
- and so on.
It’s up to you how you leverage this capability.
Conclusion
In this article, we demonstrated how to create a simple bot for Microsoft Teams capable of sending messages to a chat. We showed how to create an Azure Web App, Azure Bot, and Microsoft Teams App. We also explained how to obtain a Chat ID and, finally, how to create an Adaptive Card and send it to a chat using a Python notebook. I hope this article was helpful and that you learned something new. If you have any questions or comments, feel free to reach out.
