


APIs are great source of data and are provided by many systems. It is mostly a REST API that is based on the HTTP protocol. Already in the article APIs as Power BI Datasources, I explained in a simplified way how APIs work and what needs to be passed to them. But it was through the lens of Power Query. Some time has passed since then, and Microsoft Fabric was added to our data world, which in its interface, allows us to use not only the already mentioned Power Query but also PySpark through Notebooks.
I’m not a Python or PySpark expert, but I’ve been playing and learning with it for a while now. So I would like to share with you what I have noticed so far, what has paid off for me for the procedures, and what to watch out for. If you are a Python expert, I apologize for my possible mistakes. I will be happy if you write them in the comments so that I can correct them and learn more myself. Thank you so much for your attention and participation.
At the same time, if you have already worked with notebooks, you can skip the next chapter. If not, I recommend you read it, because in it you will learn basic information about how to work with notebooks.
Introduction to Fabric PySpark notebooks
But to be able to jump into it, we have to create a notebook of some sort. You can create a notebook within the Data Engineering and Data Science views in Fabric inside a workspace with a Fabric Capacity.
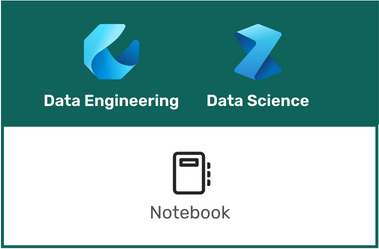 Fabric notebook
The notebook is created immediately after selecting the button with its icon, so it is good to have at least a basic overview of what I might be interested in in the notebook:
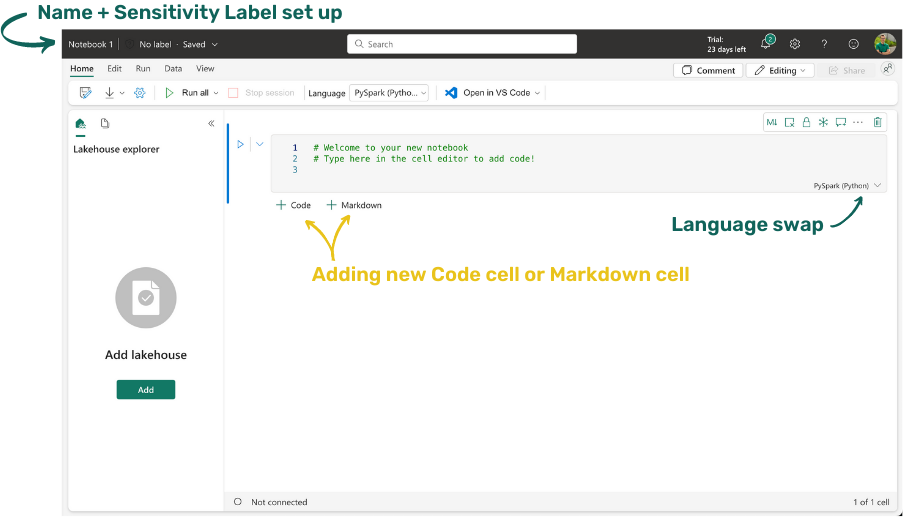 First opening of notebook
Of course, you can also see from the picture that there is an integration with Visual Studio Code, the possibility to connect LakeHouse, in which we want to save data or read it in reverse. If you have never worked in a similar environment and have no experience with Jupyter Notebooks, for example, then just brief info. A notebook is an environment in which you can write code that executes the language set in it. It is mostly PySpark, but we can also use Spark Scala, SparkR, or Spark SQL here. You can write code in individual cells that are executed sequentially. We then decide for ourselves which cell to start and which not to. We can also use the so-called “Run all”, which will start all the unfrozen cells in their exact order. The results of individual cells are then displayed below them. The results can be textu, table, chart, graphics, or even HTML.
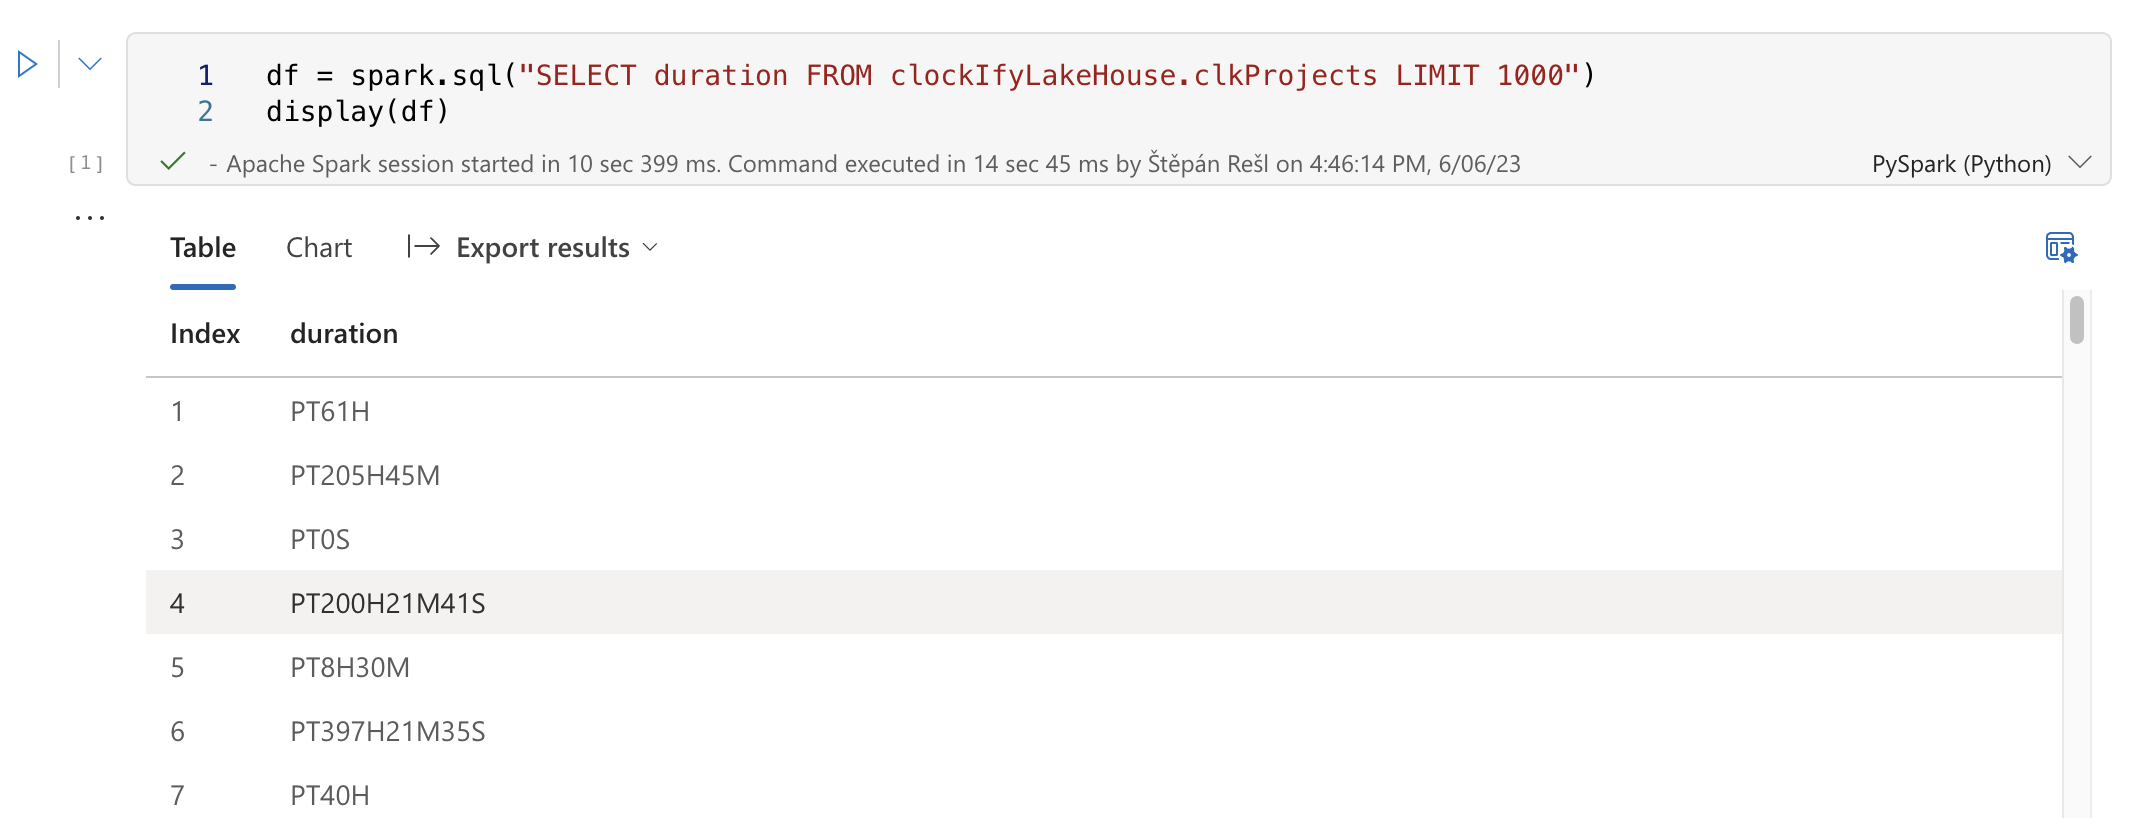 Cell result preview
We have two types of cells. Markdown cells and Code cells. What can be seen in the previous image is a code cell because it supports the execution of code in our chosen language. Markdown cells are cells that support writing text in Markdown syntax. Markdown is a simplified HTML notation that allows us to write and format text simultaneously. Many people use this notation style for its uniformity and simplicity. Even this website is written in Markdown, and only afterward is it converted to HTML.
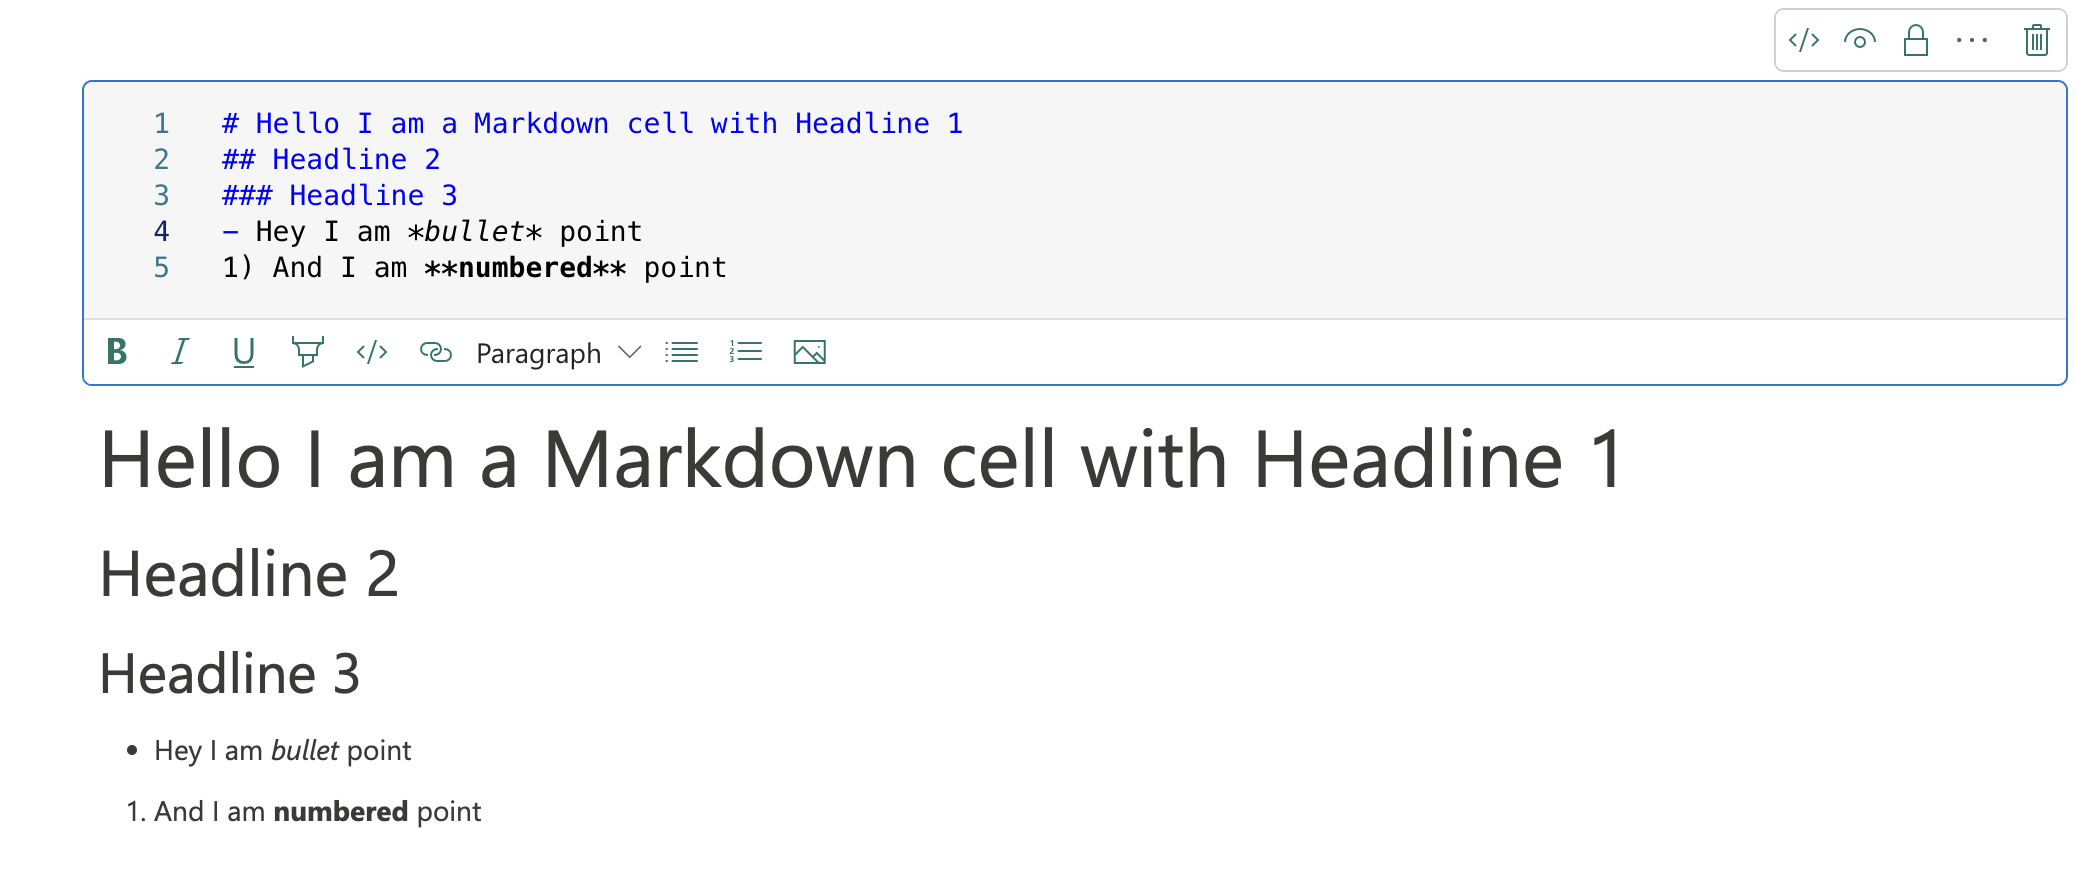 Markdown cell
As you guessed correctly, Markdown should be used to describe what is happening in the cells in the notebook. At the same time, it can be used precisely with the help of headlines to divide your code cells into logical units.
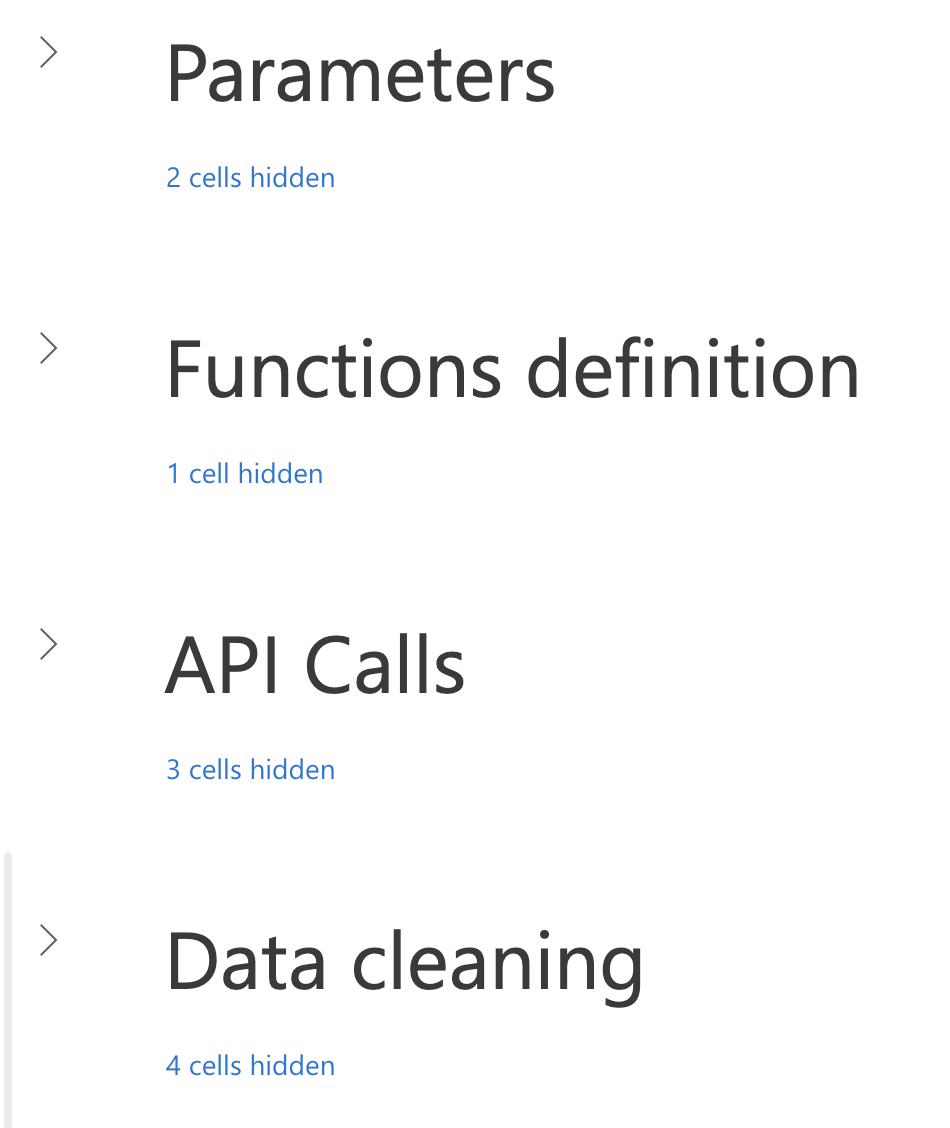 Logical parts
It is then possible to navigate the notebook much better, and at the same time, individual parts of the notebook can be started independently.
Like most other Fabric components, the Notebook has auto-save, so your changes are regularly saved. That’s why I recommend using new cells for tests, which you merge or delete but do not modify cells you have already created and are functional.
My last practical tip of this type is that on the View tab, you can find a list of all the shortcuts that will help you work on your notebook. Shortcuts will show up depending on your operating system, and there are quite a few of them, so I highly recommend checking them out.
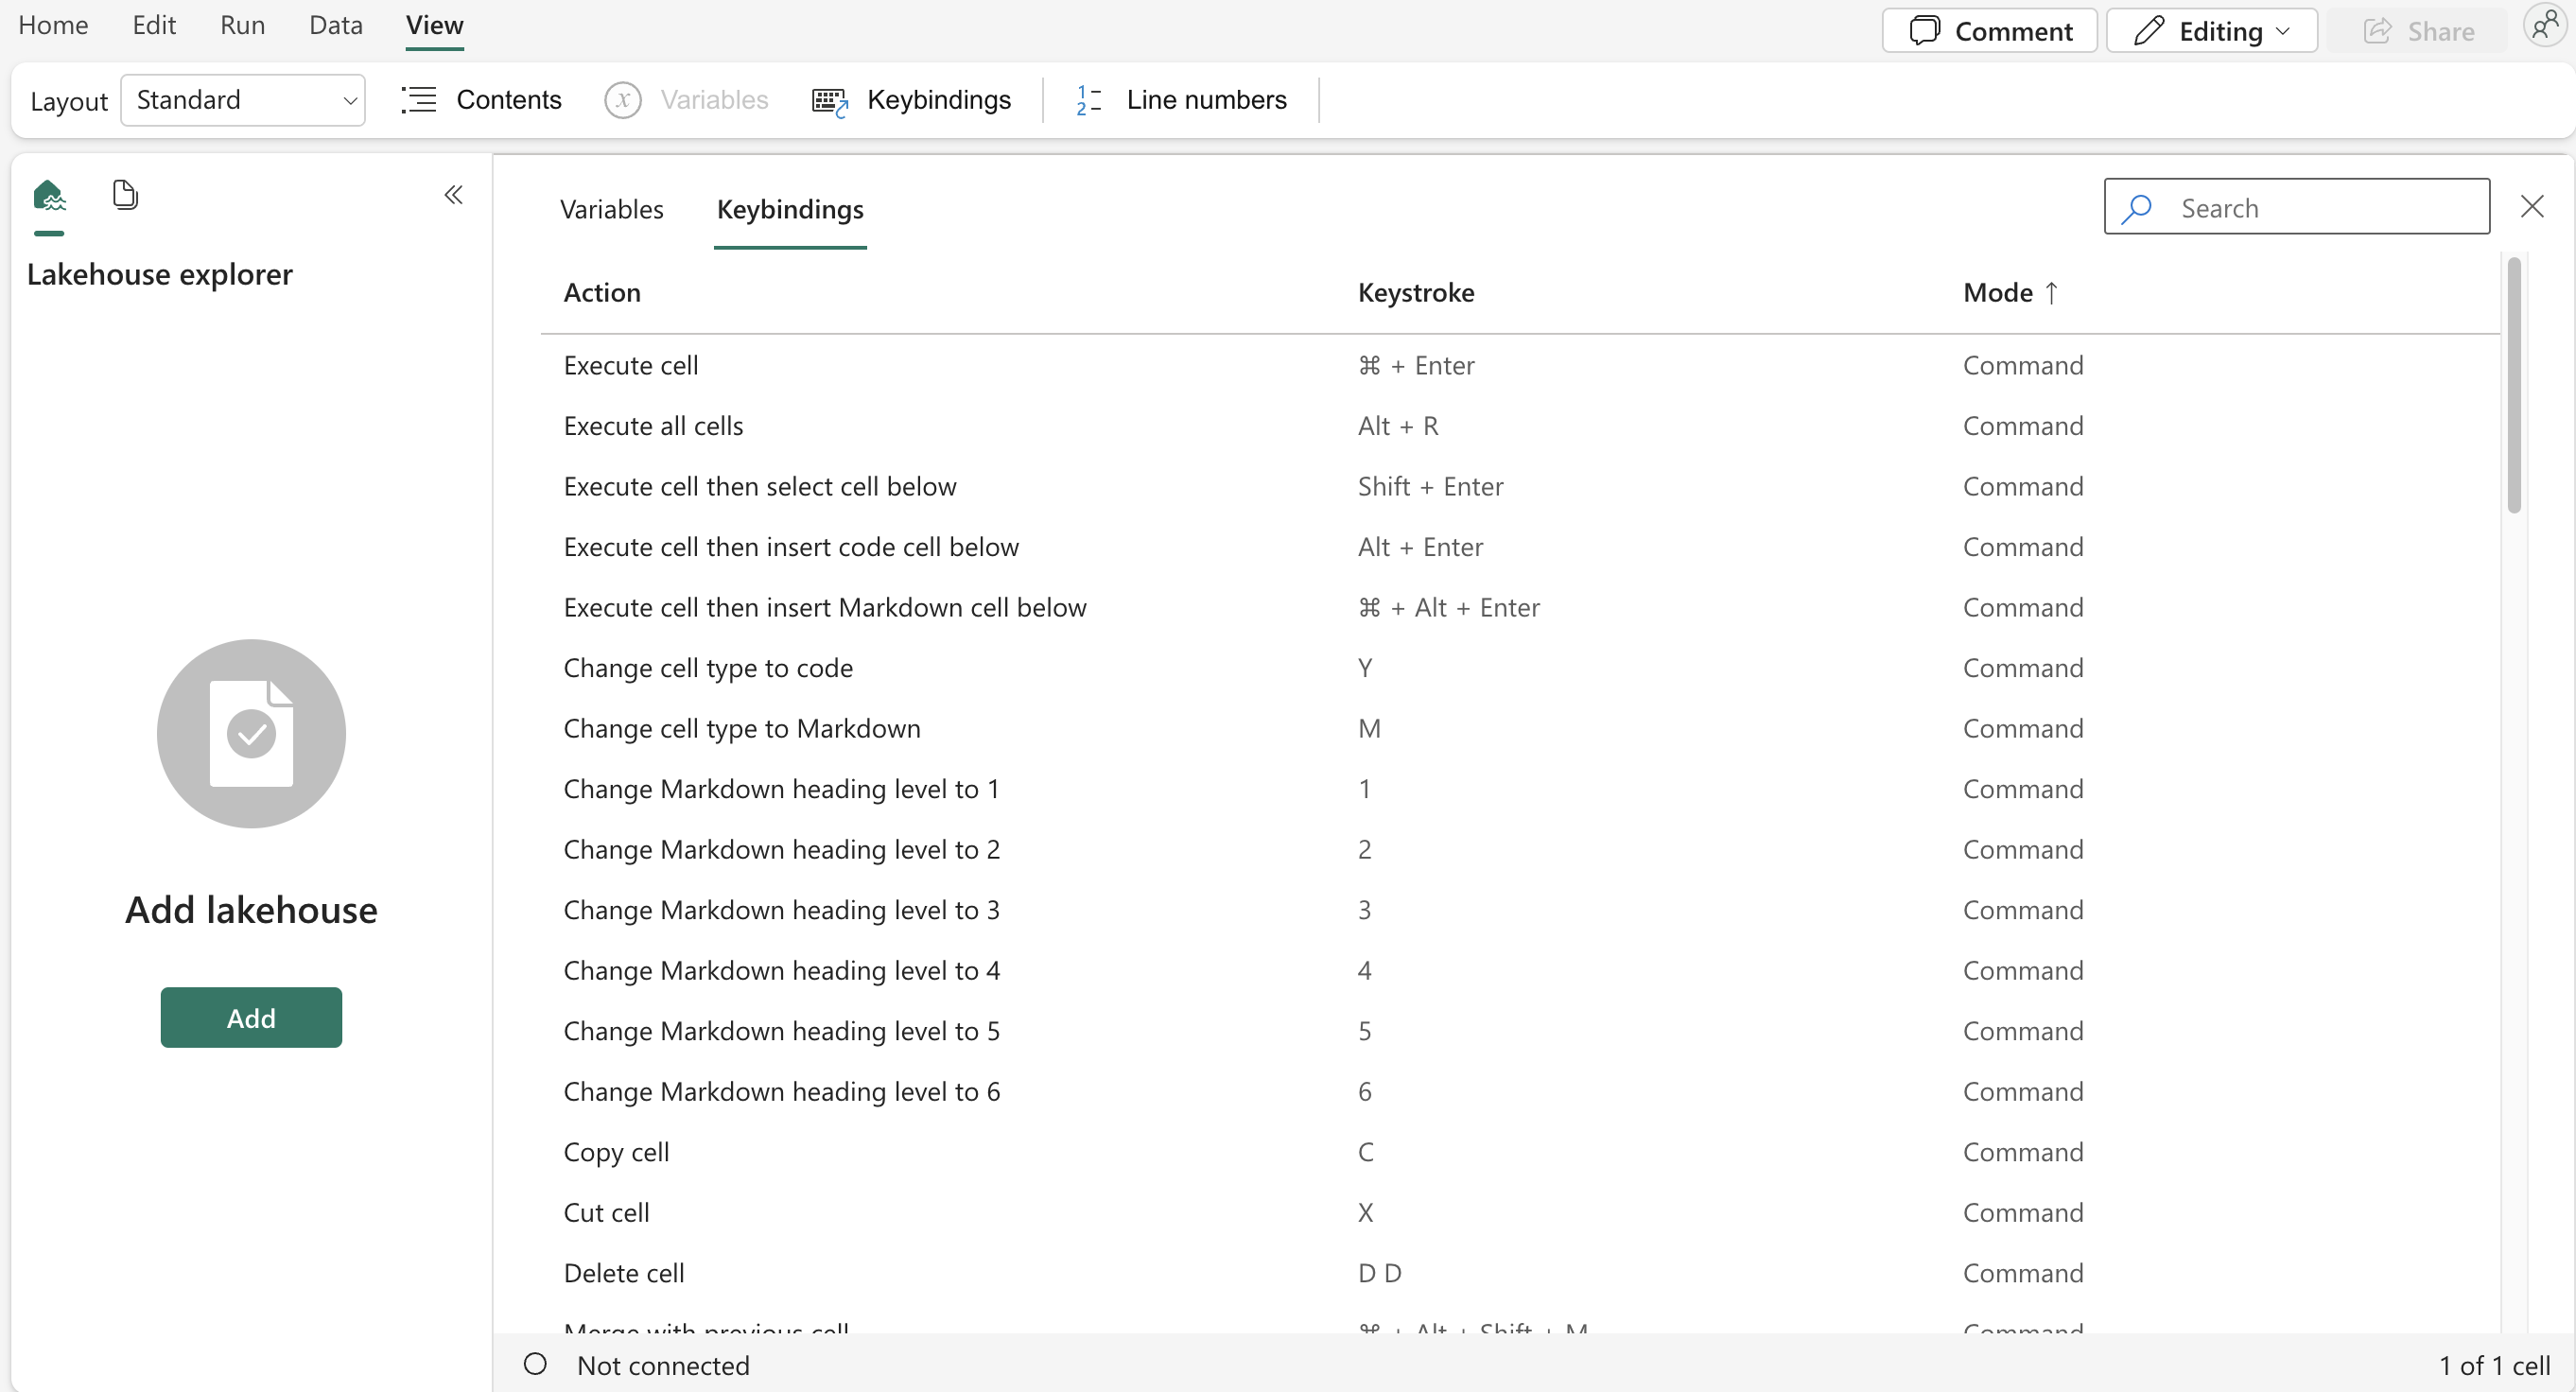 Shortcuts
But we already have the notebook, so back to the API topic.
How to get data from API
To query the API, we will need some basic libraries that will allow us to do this. When I searched for such libraries, I found more of them, but in the end, the library that suited me best: requests, which is very easy to use and at the same time supports all necessary operations.
But it needs to be added to the Notebook to use. We do this using the following code:
import requestsPlace these two magic words in the cell set as PySpark (Python) and let go. The library will be installed on the environment in this particular notebook, and we can start using it. It’s a good idea to make one cell where we’ll do all the library imports we’ll need. To avoid an error the next time you start the Notebook, because the library will not be installed, it is good that this cell with installations is always located at the beginning of the Notebook.
Other important imports we will need are:
from pyspark.sql.functions import *
from pyspark.sql.types import *
These allow you to use the functions and types PySpak offers. The asterisk at the end after import tells us that we want to import everything from the library. If we wanted only some functions, we would have to list them explicitly.
But back to requests. The request library gives us the option to either explicitly requests GET, POST, etc. calls against the API or use its “requests.request()” function, where we enter the type of request as the first parameter (just mentioned GET, POST, etc.) and as the second parameter we enter the URL we want to query. We can then save the result in a variable and continue working with it.
response = requests.request("GET", "https://api.openweathermap.org/data/2.5/weather?q=Prague&appid=<YOUR_API_KEY>")I liked this “.request” variant because, for example, when downloading data from the Power BI REST API or interacting with this API, I can create my function, which I pass the call method and the RelativePath that I need to call. It returns results without having to define HTTP Headers and Base URLs repeatedly. (because they will always be the same)
For example, such a function might look like this:
def get_api_data(method,relativePath):
  response = None
  headers = {
      'X-Api-Key': "xxxxxx",
      'content-type': "application/json"
  }
  callUrl = url + '/' + relativePath
  response = requests.request(method,callUrl, headers=headers)
  return response
The function is called “get_api_data” and has two parameters: method and relative path. The Headers declaration is defined in it, where you only need to add the X-Api-Key. At the same time, I started defining the Base URL, which in this case is stored in the “URL” variable. This variable is defined at the beginning of the Notebook and contains the base part of the address needed for all calls against the API. Similarly, we can define here any header options that we will need. The entire address is then assembled using a simple concatenation, which is one option. If we need to place the text in a string, it is possible to use the so-called f-string (string interpolation), which looks like this:
myVariable = "very"
f'This can be {myVariable} helpful'
But it is necessary to say that you should never insert passwords, secrets, keys, and generally any important information into plain text variables! This information should be stored in Azure Key Vault, which we should query for it. If you would like to use Azure Key Vault, for example, to implement OAuth2 via Service Principal, you can use the following template:
# Import of the Trident Token Library
import json
from trident_token_library_wrapper import PyTridentTokenLibrary
# Parameters
url = "https://api.fabric.microsoft.com/v1"
# Name of the Key Vault
nameOfKeyVault = '<NAME-OF-KEY-VAULE>'
keyvault = f'https://{nameOfKeyVault}.vault.azure.net/'
# Names of the secrets saved in Key Vault
tenantId_SecretName = '<NAME-OF-TENANT-ID>' # Tenant ID
clientId_SecretName = '<NAME-OF-CLIENT-ID>' # Client ID of Service Principal
clientSecret_SecretName = '<NAME-OF-CLIENT-SECRET>' # Client Secret of Service Principal
# Function definition
## Function for getting secret from Key Vault
def get_secret_from_keyvault(secret_name):
access_token=PyTridentTokenLibrary.get_access_token("keyvault") # Get Access Token for Key Vault
return PyTridentTokenLibrary.get_secret_with_token(keyvault,secret_name,access_token) # Return Secret
## Function for getting Bearer Token
def get_bearer_token():
resource = "https://analysis.windows.net/powerbi/api" # Resource for Power BI API
tenant_id = get_secret_from_keyvault(tenantId_SecretName) # Get Tenant ID
client_id = get_secret_from_keyvault(clientId_SecretName) # Get Client ID
client_secret = get_secret_from_keyvault(clientSecret_SecretName) # Get Client Secret
url = f'https://login.microsoftonline.com/{tenant_id}/oauth2/token' # URL for OAuth2
data = f'grant_type=client_credentials&client_id={client_id}&client_secret={client_secret}&resource={resource}' # Content that will be sent for OAuth2
headers = {'Content-Type': 'application/x-www-form-urlencoded'} # Headers for OAuth2
response = requests.post(url, headers=headers, data=data)
return response.json()["access_token"] # Return Bearer Token
## Function for getting response from API
def get_response_json(relativePath, method, data, payload_object):
fullurl = url + '/' + relativePath # Full URL for API call
bearer_token = get_bearer_token() # Get Bearer Token
headers = {'Content-Type': 'application/json', 'Authorization': f'Bearer {bearer_token}'} # Headers for API call
response = requests.request(method, fullurl, headers=headers, data=data)
if payload_object == "": # If payload_object parameter is empty, return response as a JSON
return [response.text] # Return response as a text
else:
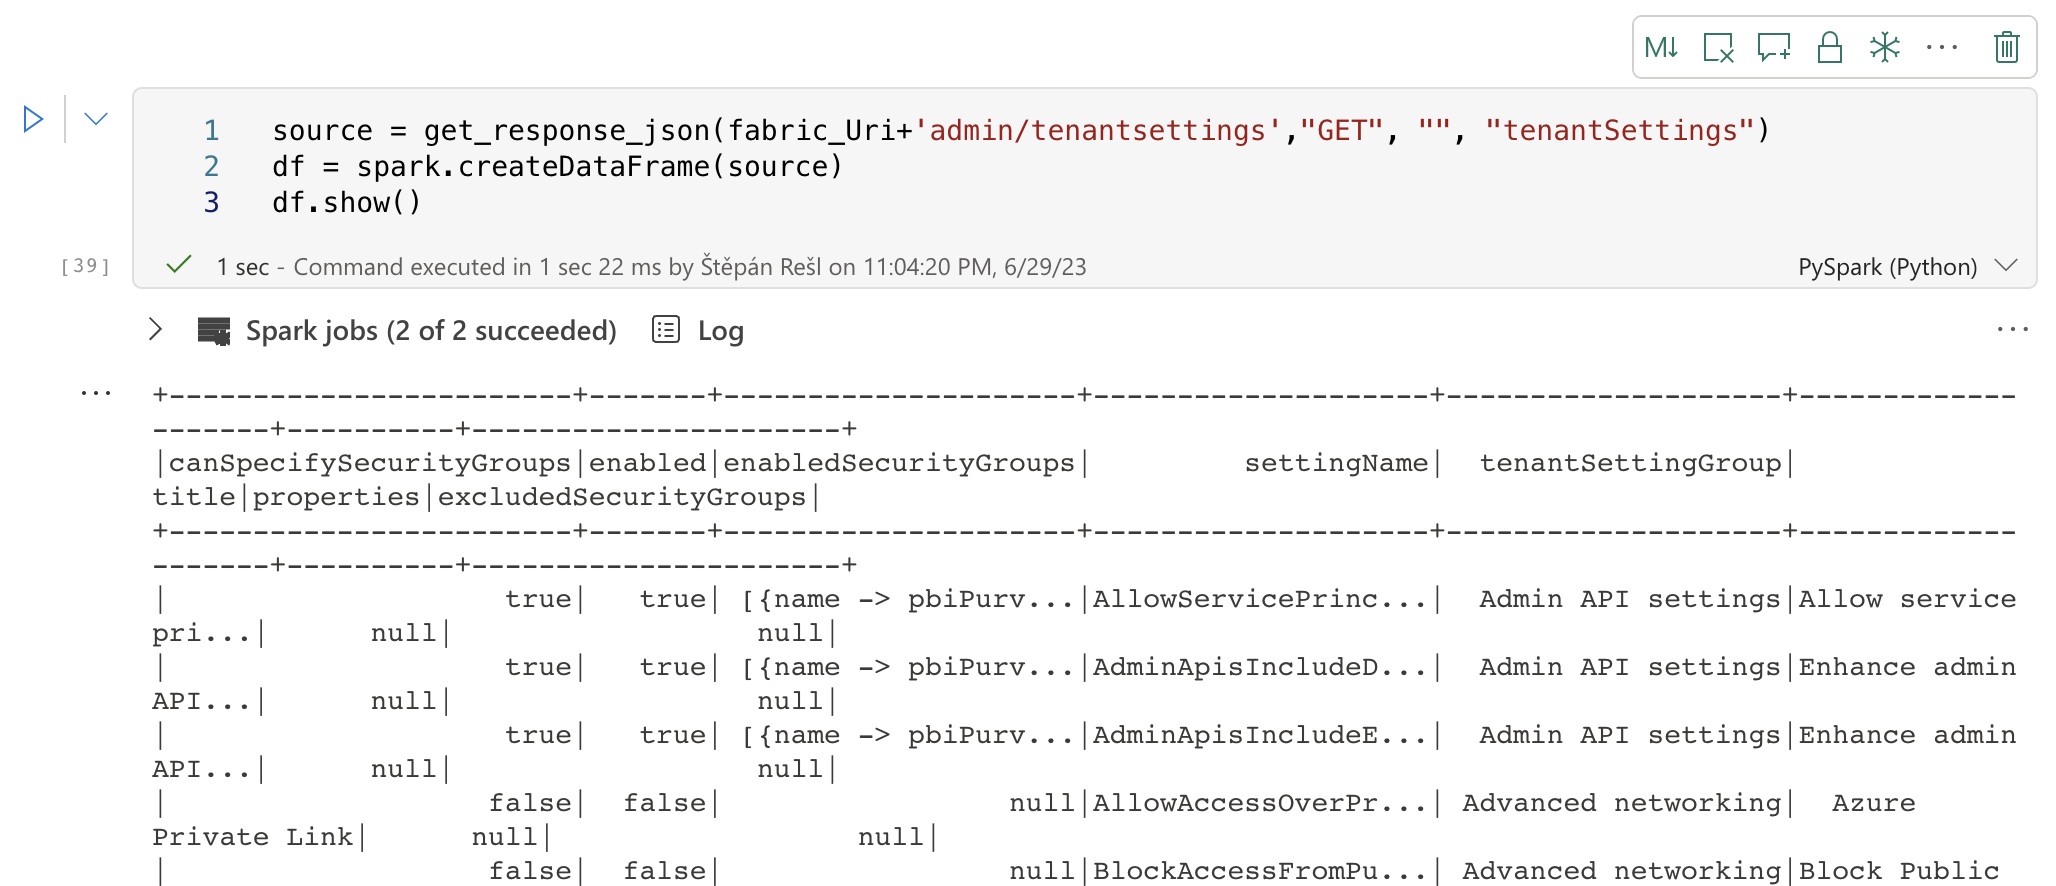
return response.json()[payload_object] # Return response as a JSON and select only the payload objectThanks to this, I can make, for example, the newly added call to get tenant settings via Tenant Settings of the Fabric REST API endpoint:
source = get_response_json('admin/tenantsettings',"GET", "", "tenantSettings")
source
Tenant Settings Call
Saving data to LakeHouse
As I already mentioned, we have two basic options. Either we save our data as files or as tables. If we decide on files, we can choose between different types of files, including JSON, CSV, or even Parquet.However we can not save the file directly within Pyspark. It is necessary to convert it to a DataFrame (abbreviation df) and then save it. .
There are many variants of how we can get a DataFrame, and not all of them always work because some are limited, for example, so all levels/columns in the file always contain the same number and the same names. This can be different, especially with APIs! You will often encounter that the API only returns some of the name fields if any are empty. This makes perfect sense because why would an API return name fields that contain no value. But we have to be able to solve it somehow. Fortunately, a “spark.createDataFrame()” function allows us to create a DataFrame from any source. In our case, the JSON file we got from the API.
source = get_response_json('admin/tenantsettings',"GET", "", "tenantSettings")
df = spark.createDataFrame(source)
If we want to see the DataFrame’s contents, we can use “.show()”.
 Show DataFrame
Once we have a data frame, we can do anything with it. Filter data, delete columns, create new columns, expand nested lists, and more…
But as I said, we can write the DataFrame in different formats. In our case, we will choose JSON. To do this, we need to call the “.write.mode(“overwrite”).format(“json”).save(“Files/FOLDER-FOR-OUR-FILES”)” method on our DataFrame. The word Files is intentionally used within the save section, as this is a reserved location for files within LakeHouse. If you want to dive deeper, add slashes and define the whole path. For tables, we have the Tables location.
The code to create the files looks like this:
df.write.mode("overwrite").format("json").save("Files/ExtractedJsons")Don’t panic! Since PySpark uses data distribution, a folder with several files will be created for you. Each file contains part of our data. In our case, it is seven files.
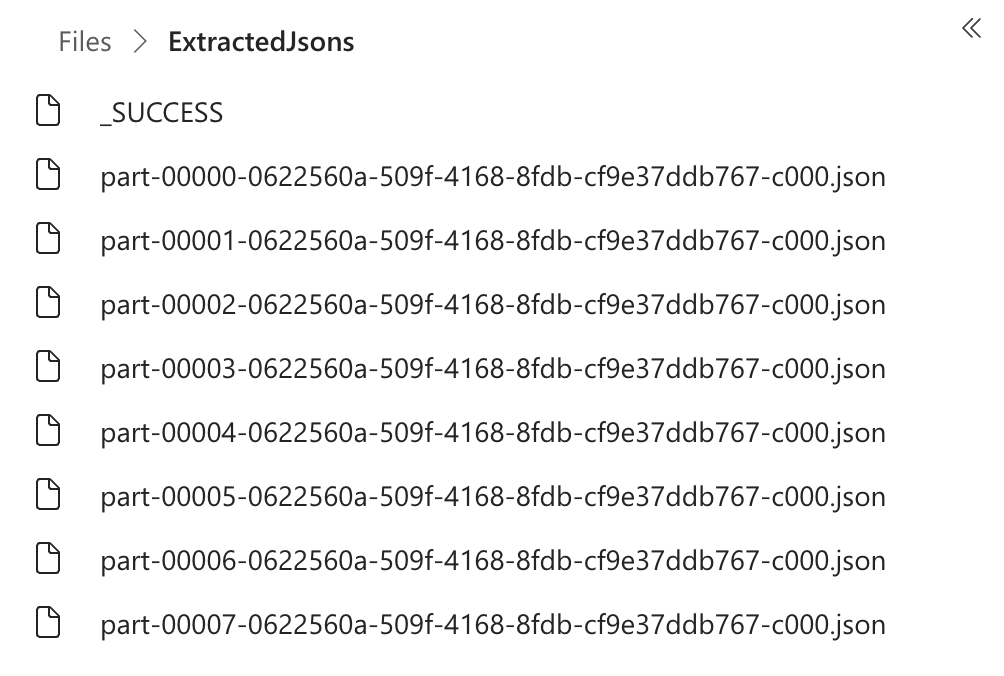 Created JSON Files
So if we want to create a table, we can do it as follows:
source = get_response_json('admin/tenantsettings',"GET", "", "tenantSettings")
df = spark.createDataFrame(source)
writeToLake = df.write.mode("overwrite").format("delta").save("Tables/TenantSettings")
The result is creating a delta table called TenantSettings, which we can use in SQL queries.
 Created Table
I will mention one more tip, which has come in handy several times. If you want to create a table and manually define values in it, you can do that. There are more methods than usual, but I needed, for example, to create a table with one column named “id” and different IDs.
listOfIds = [["0000000-1111-1111-1111-4d23d76e87d7"],["0000000-1111-1111-1111-2abccb7b62fe"]]
columns = ["id"]
df = spark.createDataFrame(listOfIds, columns)
It follows from the code that you can still use the same method to create a DataFrame and change the column names directly. What use could such a thing be to me? For example, to use them to try to start scanning workspaces via the Power BI Scanner API.
post_WorkspaceInfoUrl = "https://api.powerbi.com/v1.0/myorg/admin/workspaces/getInfo?lineage=True&datasourceDetails=True&getArtifactUsers=True&datasetSchema=True&datasetExpressions=True" # POST URL for getting workspace info with parameters

bearer_token = get_bearer_token() # Get bearer token
header = {'Content-Type':'application/json', 'Authorization':f'Bearer {bearer_token}'} # Create header for POST request

df = spark.sql("SELECT * FROM Fabric_Admin_Storage.wsdemo LIMIT 1000").toPandas()['id'] # Get IDs from Delta table
df = {"workspaces": list(df)} # Create JSON with IDs

post_WorkspaceInfo = requests.post(url=post_WorkspaceInfoUrl, headers=header, json = df ) # POST request for getting workspace info
print(post_WorkspaceInfo.text) # Print response
Spark operations vs. non-Spark operations
I intentionally put this issue on the list because it took me a while to figure it out. That is before I opened the documentation and read why the operation I was trying to solve kept returning as an error.
As soon as we are in the PySpark DataFrame framework, many operations open up for us that we can do with such a data frame. One crucial thing is to add new columns / transform old columns. We have a “.withColumn()” method for this within PySpark.
df = df.withColumn("newColumnOne", lit("newColumnValue")) # Create new column with value: "newColumnValue"
df = df.withColumn("newColumnTwo", col("oldColumn")) # Create new column with value from old column
df = df.withColumn("newColumnThree", col("oldColumn") + 1) # Create new column with value from old column + 1
df = df.withColumn("newColumnFour", col("oldColumn") + col("oldColumn2")) # Create new column with value from old column + value from old column2
df = df.withColumn("newColumnFive", df.oldColumn * df.oldColumn2) # Create new column with value from old column * value from old column2
This feature is quite a sledgehammer because, with its help, you can add columns or overwrite existing ones! So, if I didn’t add a number after “newColumn” in the previous entry, the newly created column would be constantly overwritten. In the end, it would contain only the last entered variant.
That’s great, but what if we use something outside the PySpark library? For example, a function that can convert ISODATE “PT2H10M” to seconds? At that moment, we would have a problem to solve. Of course, we will start with the fact that we will need to import a library that allows working with ISODATE. This was quite a shock for me because I had long been used to Power Query being able to work with this notation, and immediate conversion to the duration data type was possible, which is not available in PySpark.
import isodateBut this library is not a PySpark library, so we cannot use it directly within PySpark. However, to use it, we have to use the UDF (User Defined Function) method, which allows us to use a function not part of PySpark. At that point, PySpark will not optimize it but it will be usable.
If we were to define it as, for example, a lambda function, we could use the following notation.
pt_duration_to_seconds = udf(lambda x : isodate.parse_duration(x).total_seconds(), FloatType())
df = df.withColumn("newColumn", pt_duration_to_seconds(col("oldColumn")))
Follow-up API requests and pagination
With queries to the API, it can very often happen that we don’t get all the data on the first request, and at the same time, if we want to get our data, we first have to make another query there and then branch out the individual queries to get what we’re looking for.
These two issues are the last pieces we should show ourselves because they are essential.
Follow-up API requests
It is very typical for APIs, and it is also the case with the Power BI REST API, for example, that if you want to get to some detail, you have to peel off the onion layers gradually. So the first query will go, for example, to a list of all the workspaces you have available. Then, thanks to their API, you get all the reports, and only then do you get a list of the individual pages in the reports.
This onion peeling is very typical and nothing to worry about. You have to get used to it and know that it is like that and how to deal with it.
A possible approach to the solution is that we gradually save between the stages, which we then use in other queries. These intermediate stages can be within a variable or a stored format, and it doesn’t matter whether they are tables or files. Whether we choose what is better for us depends on what options we have and what our requirements are. If we are explicitly only concerned with the lowest layer, then there will be variables. But if we want to be able to go back to the obtained values for higher layers of the onion sometime in the future, either for transformation or further insight, then, of course, it is better to use the formats for saving to Lakehouse.
If we go with the second option and want to save all of them among the results, we would proceed similarly, as shown in the previous chapter. We would run a query -> Store the data -> Load the data from a table using SparkSQL, for example, -> Run another query on the data. And so on.
In the case of the first variant, we have all the data in a variable and can work with it. To work with them as easily as possible, it is useful to narrow the entire data frame in a variable to only those columns we need if it’s just one. So much better! We can do this using the select method to select only the columns we want. Next, we can use the collect method to get data from the DataFrame into a variable with the data type list.
listOfIds = previousResponse.select(['id']).collect()We can then review this sheet and gradually obtain the needed data, which we can do with a simple for loop.
response_list = []
for requestId in listOfIds:
    response = get_api_data("GET",requestId[0])
    response_list.append(response.text)
However, if you tried this function with the original write-up of the get_api_data() function, you would need help. The Notebook will tell you that this type of writing does not guarantee that everything will finish as it should. In general, PySpark wants to ensure that you give it a function that terminates under all circumstances. We need to modify our function a little more.
def get_api_data(method,relativePath):
  response = None
  headers = {
      'X-Api-Key': "XXXXXXXXX",
      'content-type': "application/json"
  }
  callUrl = url + '/' + relativePath
  try:
    response = requests.request("GET",callUrl, headers=headers)
  except Exception as e:
    return e
  if response != None and response.status_code == 200:
    return response
  return None
Now this function checks to see if we have fallen into Error, which it would eventually return. Furthermore, we got to the data thanks to the 200 status, and some data was transferred to us. If these two conditions are not met, then None is returned. This is equivalent to returning an empty string.
The important thing is that, in this case, the Notebook will finally let you link the query.
Pagination
There are many pagination variants, depending on how the API is designed. But we mostly encounter some parameter in the response that tells us that we have another page. In such a case, you must create a cycle to call the API and get data gradually.
Another variant is an iterative paging parameter that we pass to the API, for example, as part of an HTTP Query. Often this is simply the number of the page we want to get. At that point, we don’t know exactly how many times we will have to iterate, and we need to build a loop that will call the API and get data until it returns an empty response.
I recently solved one such pagination and concluded that it could be produced much more simply than in Power Query, where even there, it is done using List.Generate() is very simple.
page = 1 # Set initial page number
while True:
    response = get_api_data("GET",'/user/<USER-ID>/time-entries?page-size=5000&page=' + str(page))
    if len(response.text) > 2: # Check if response is not empty or if it is not just "[]"
        response_list.append(response.text) # Append response to list
        page = page+1 # Increase page number
    else:
        break # Break the loop if response is empty
We convert the resulting sheet with responses from the API to a data frame, and that’s it. If this API looks familiar because of the address, it’s an API for a timesheet app called ClockIfy. But as you can see, it’s just a few lines of code and done.
Summary
I purposely titled this article Lessons Learnt because the few tips and examples you can find here are exactly the things I wish I had had in hand when I was starting with these notebooks or when I was struggling with them and he couldn’t solve some things.
In general, downloading and working with an API is very pleasant in PySpark, and once you get the hang of it, it’s also quite a fast thing from a development point of view. From a speed point of view, this matter depends on your API. However, I compared the speed of downloading data from the API in Power Query and Notebook. In that case, the measurements show that Notebook with PySpark is significantly faster in this case. For example, when downloading data from the ClockIfy API, the Notebook managed all the entries in 1 minute and 20 seconds, including writing to Lakehouse. The same process in Power Query took 4 minutes and 53 seconds, which is a significant difference. For now, however, it is necessary to consider that Fabric is in the Preview version, so some things can change, which can be changed for the better and worse for both parties. At the same time, the biggest bottleneck so far is writing to Lakehouse, which is still slow on the Power Query side in Dataflow Gen 2. But even that can change.
I also highly recommend Sandeep Pawar’s blog called Fabric Guru with content on PySpark, Notebooks, and Fabric in general.
I hope you enjoyed this article and find it helpful in your work with PySpark. Feel free to write in the comments if you have any questions. Likewise, if we have ideas to improve what I’ve shown here, feel free to write. I am delighted to learn something new and improve.
At the very end, I give one piece of advice that has paid off for me in any language I’ve learned: that it’s good to make a document/cheatsheet file where you save everything you’ve tried to solve and more in it it isn’t. This “little” trick can save you a lot of time, especially nerves, because you will have somewhere to go for answers/inspiration. Of course, this entails a requirement for structure and that you need to write it all down, not just solve it and forget it. But trust me, and it’s worth it.